SSO Salesforce Setup
The following instructions set up an identity provider in Salesforce.
Introduction
Salesforce is a Single Sign-On (SSO) Provider and application portal. Tehama can be integrated with Salesforce through SAML and presented as a managed application alongside other Salesforce integrated applications.
Once enabled, authentication to Tehama must be made through Salesforce - local authentication through https://app.tehama.io is no longer possible except by using the Tehama Org Admin account. Unless you enabled user provisioning, Salesforce/Tehama Integration is limited to authentication only.
A user account is required for Salesforce.
If you do not enable user provisioning, then a user account is also required for Tehama. Both the Salesforce account and the Tehama account must be configured with the same email address for SSO to work, and the user must accept the Tehama Welcome email before they will be able to launch a connection via Salesforce SSO.
Create a connected application
Create a Developer Salesforce account
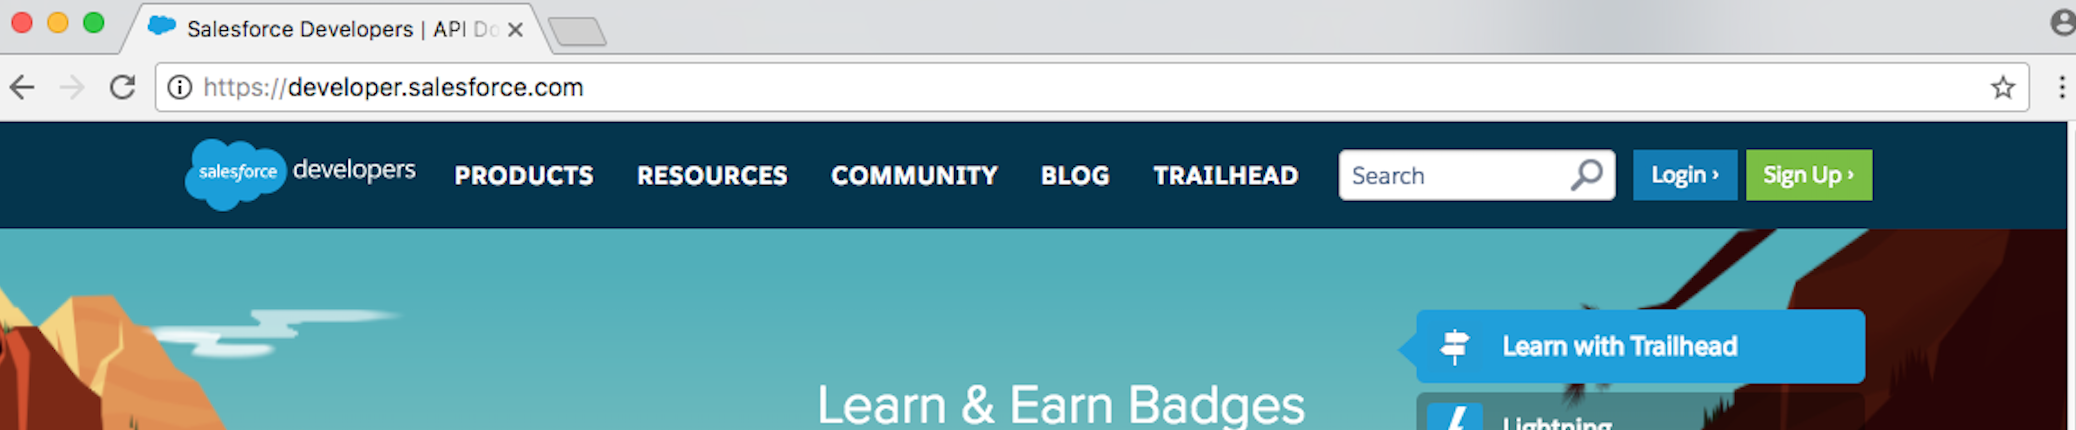
- In a browser tab, go to the address developer.salesforce.com.
Click on the Sign Up > button at the top right to sign up for a Salesforce Developer account.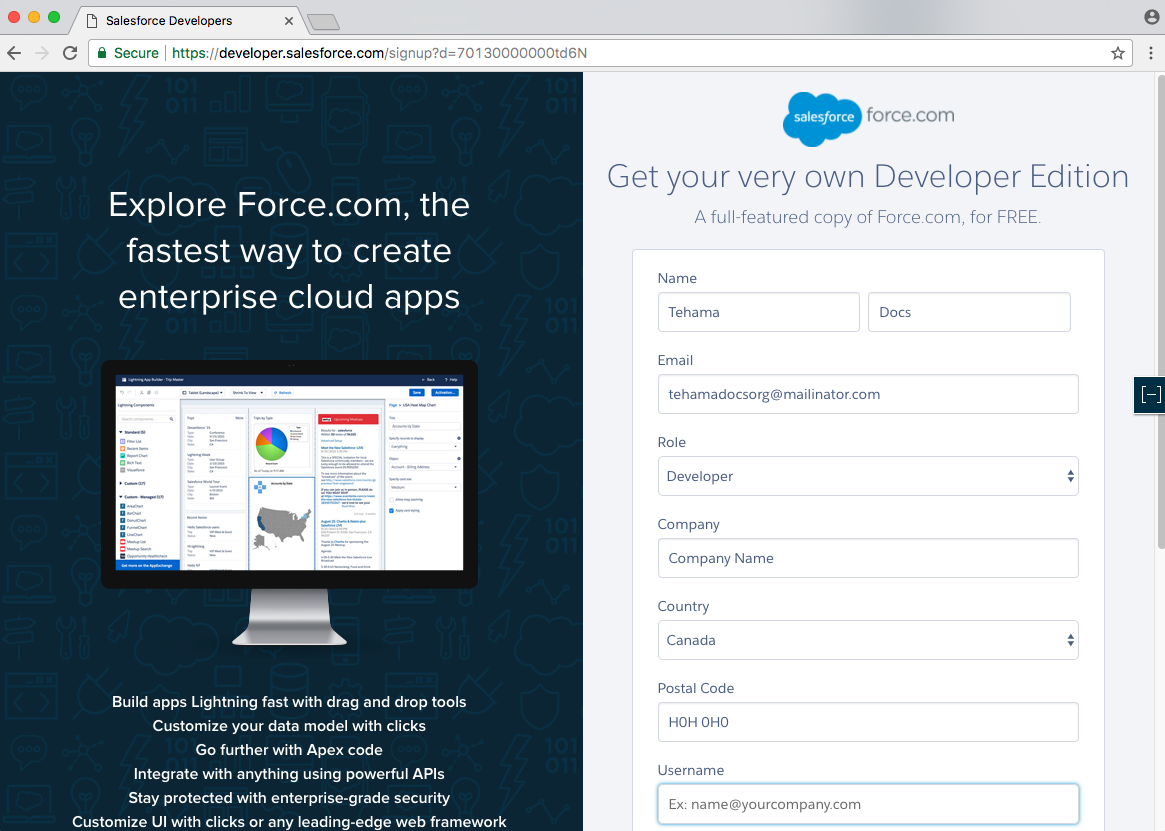
Follow the instructions provided. When completed, Salesforce will send you a "Welcome" email.
- Login using the email sent to you in the last step.
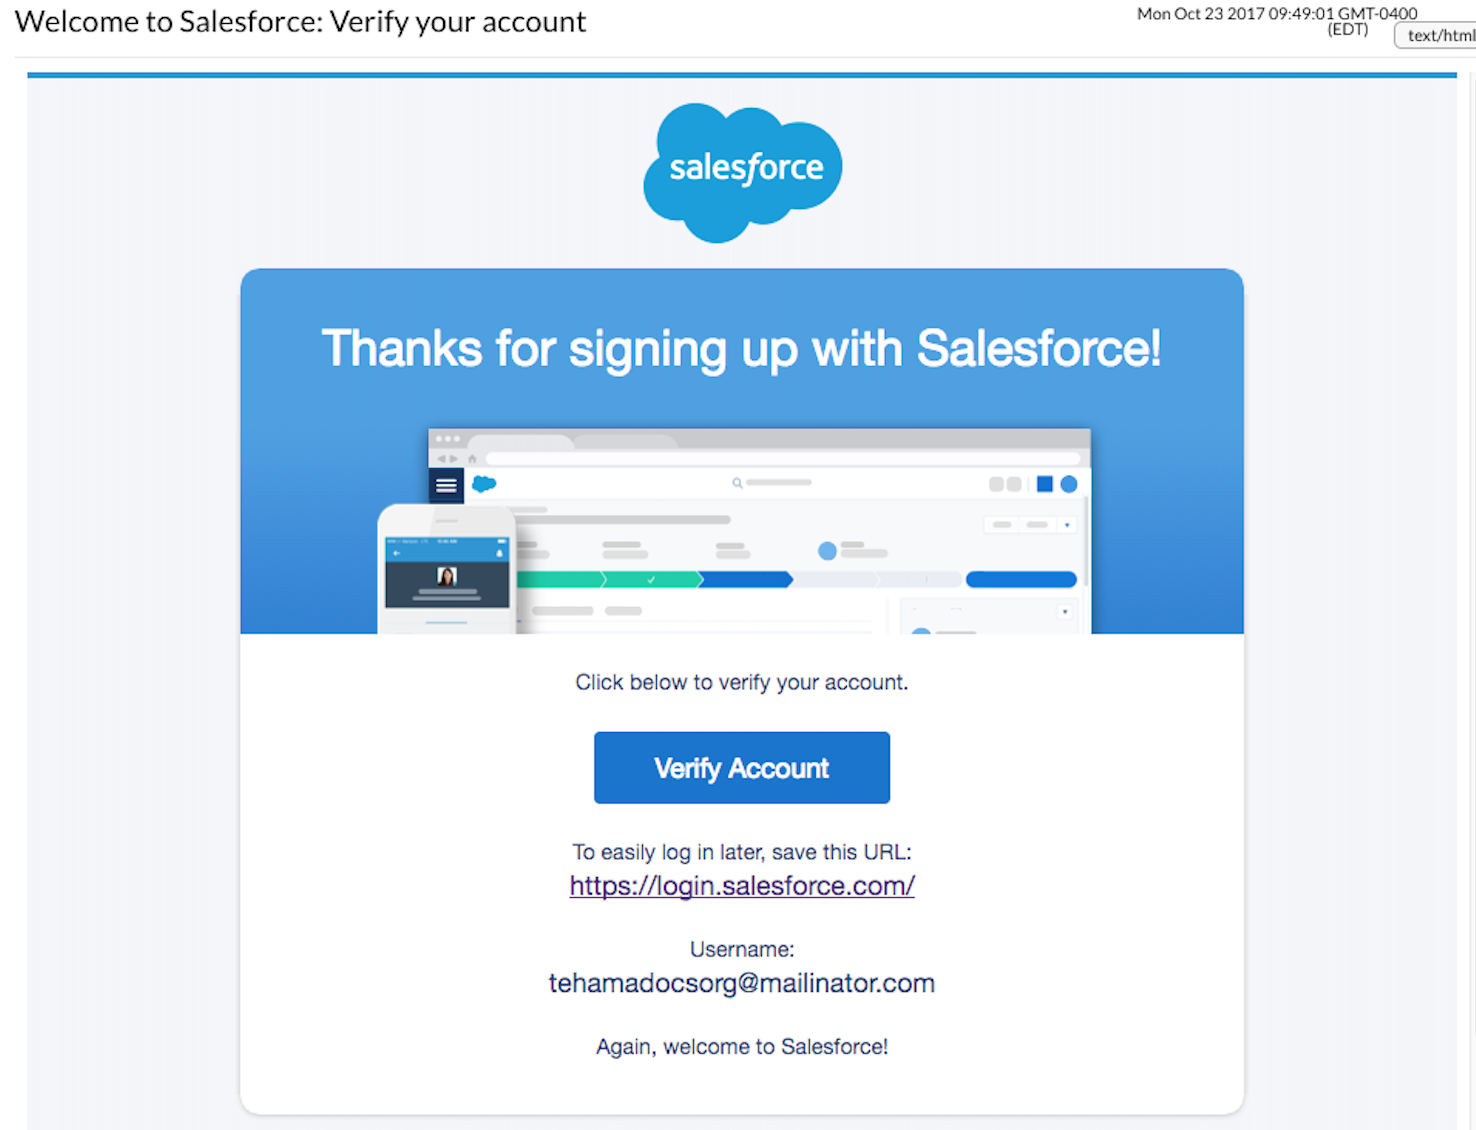
Click on the Verify Account link in the email. If asked to change your password, go ahead and do so.
Configure a Developer Salesforce Domain
Now that you are logged in to your Salesforce Developer Account, you need to configure a Domain.
- Go to the Setup page.
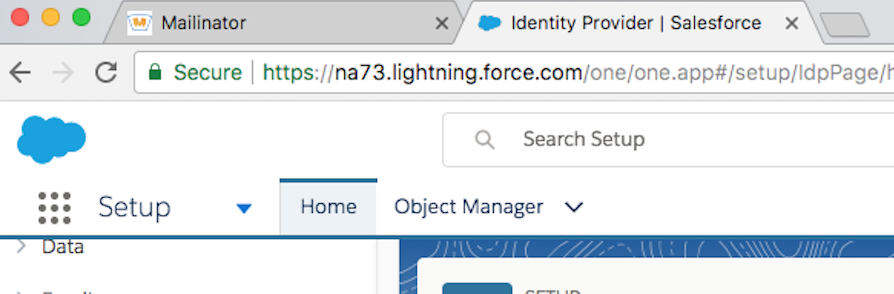
- Scroll down the left side-bar menu and Select Identity > Identity Provider
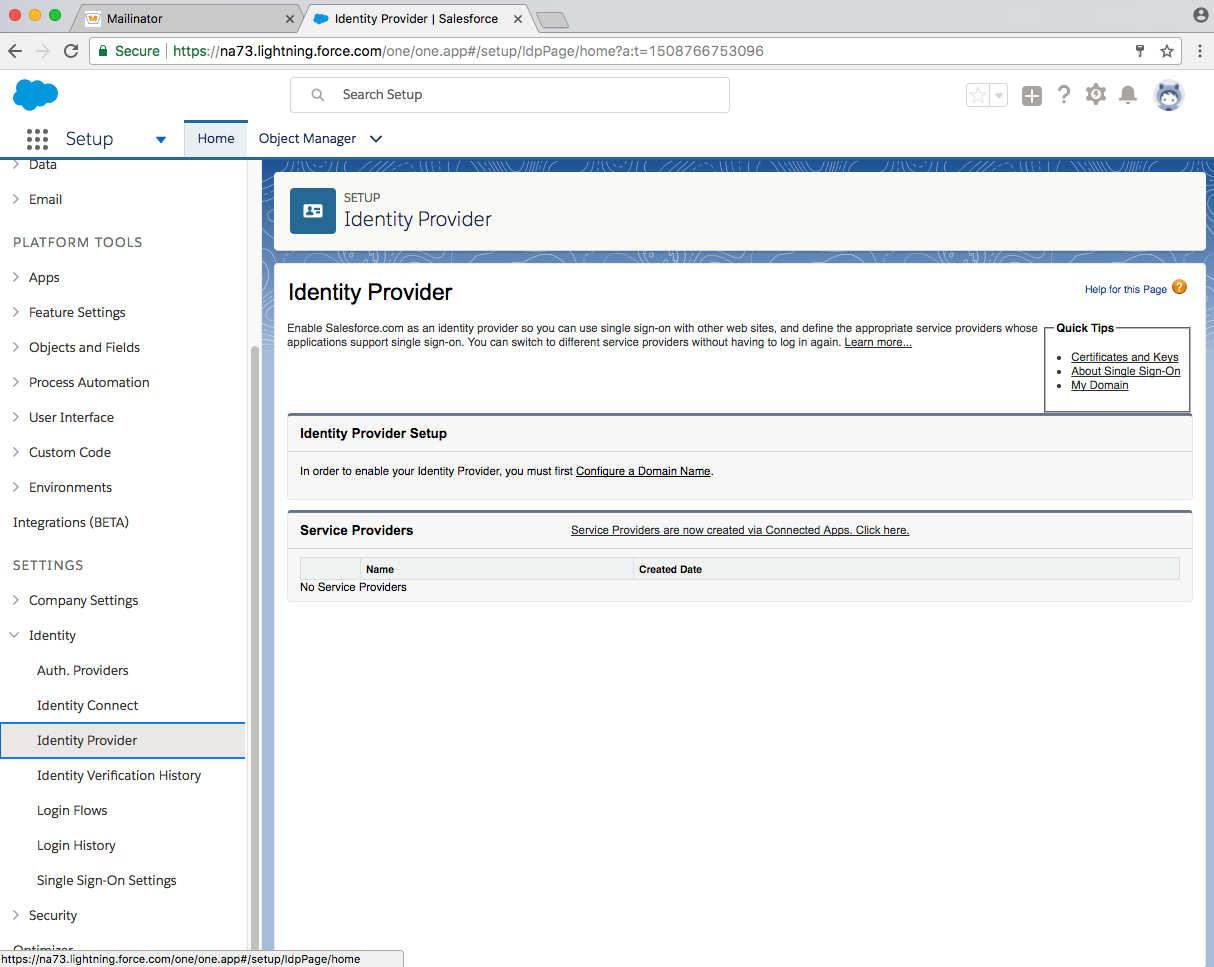
- Click on Configure a Domain Name, found under "Identity Provider Setup".
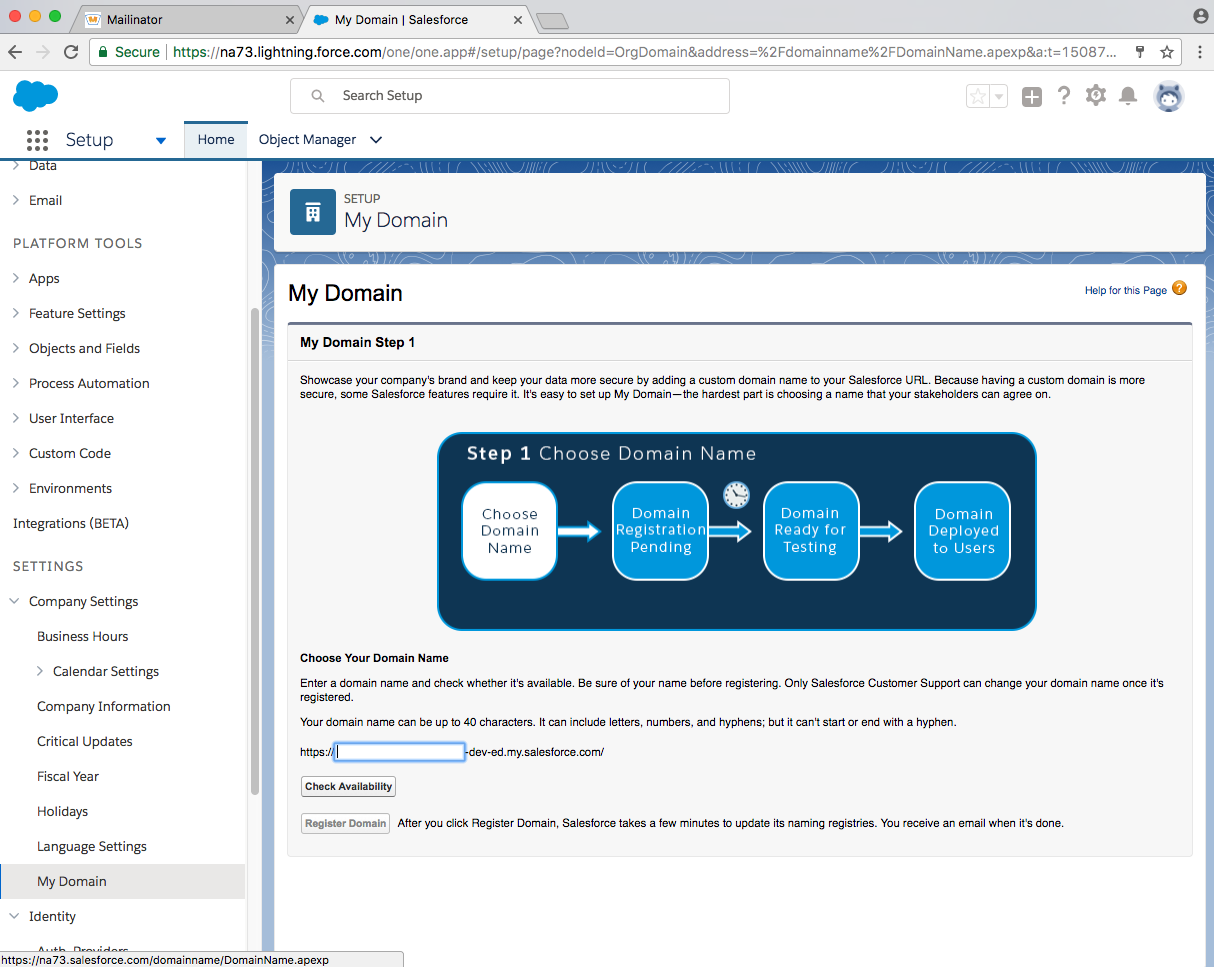
- Enter a domain name into the url line. Click Check Availability to make sure it is unique.
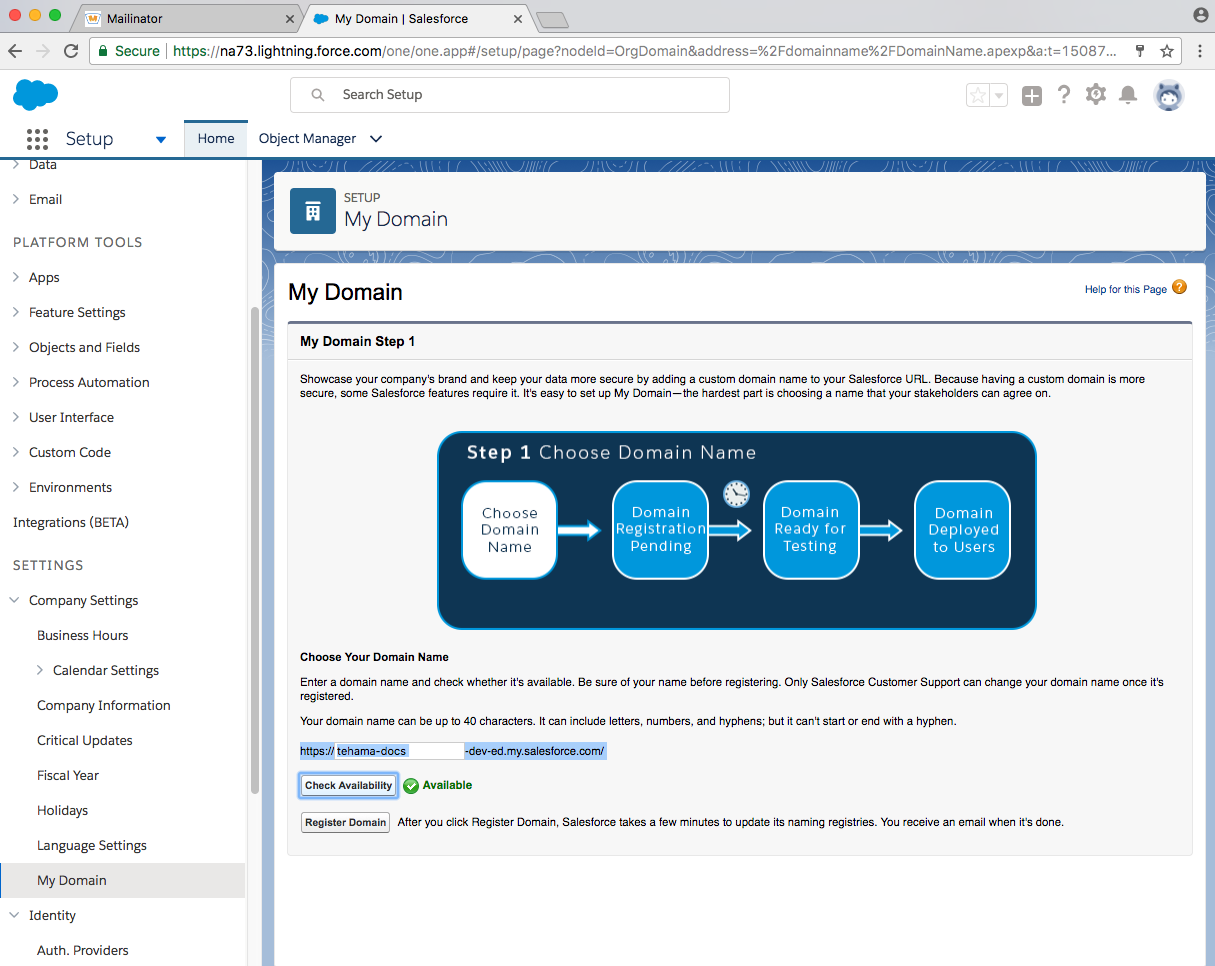
- Click Register Domain to set up your new domain.
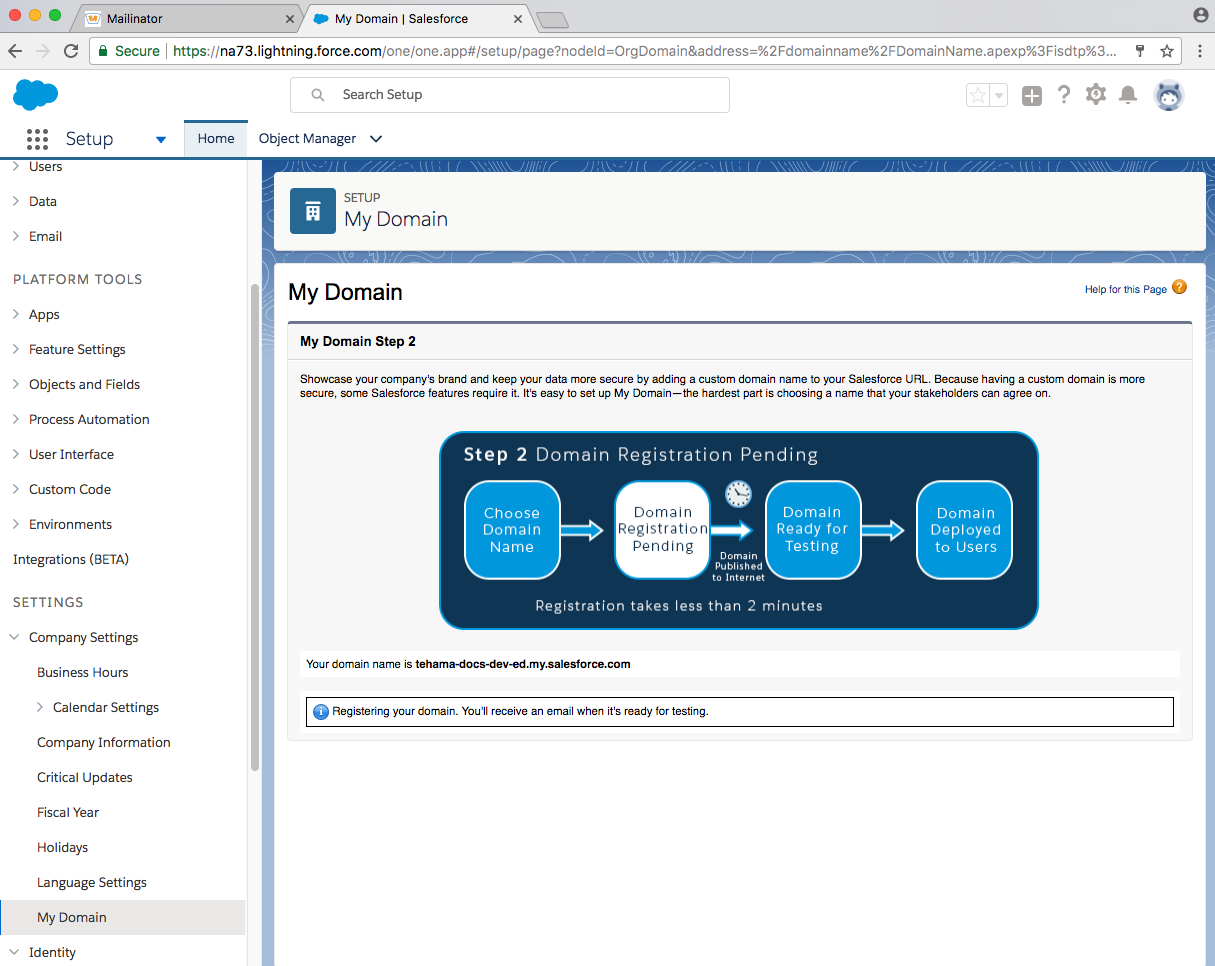
- Wait for a confirmation email to arrive.
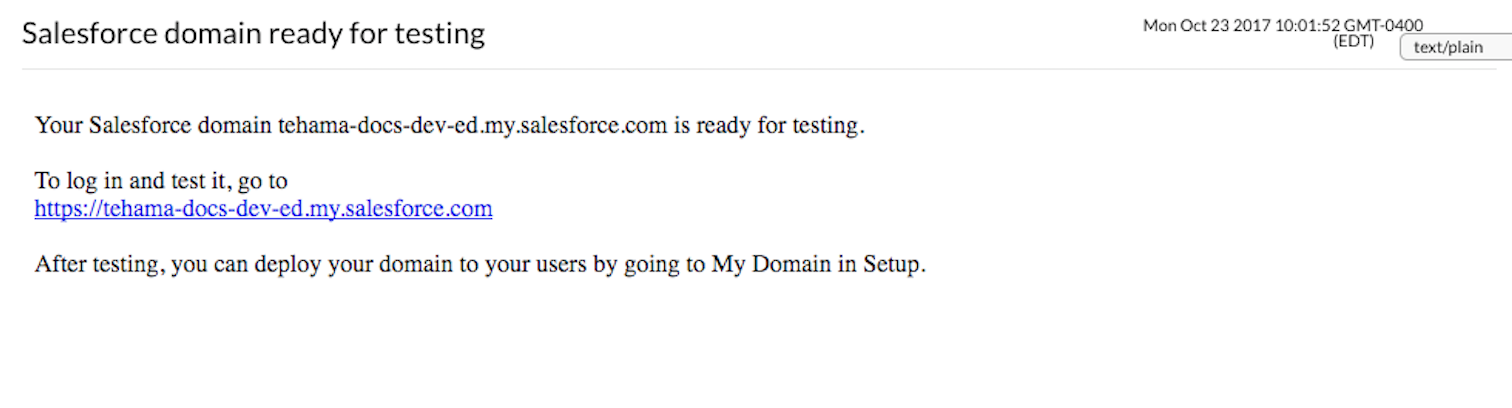
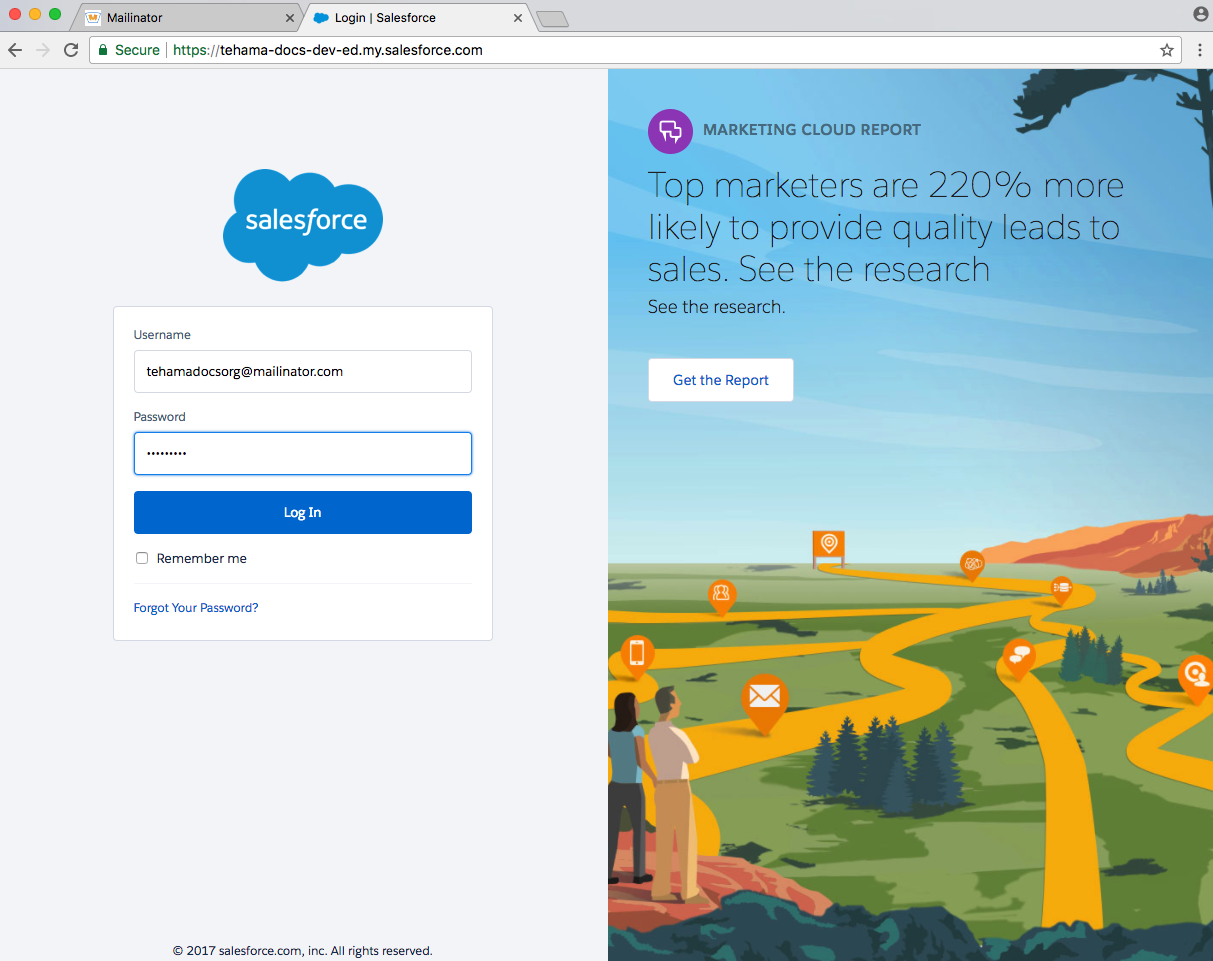
- Click on the link in the email to sign in with your new domain.
You may be asked to register your mobile phone with your new domain. Proceed if desired or click on one of "Remind Me Later" or "I Don't Want to Register My Phone".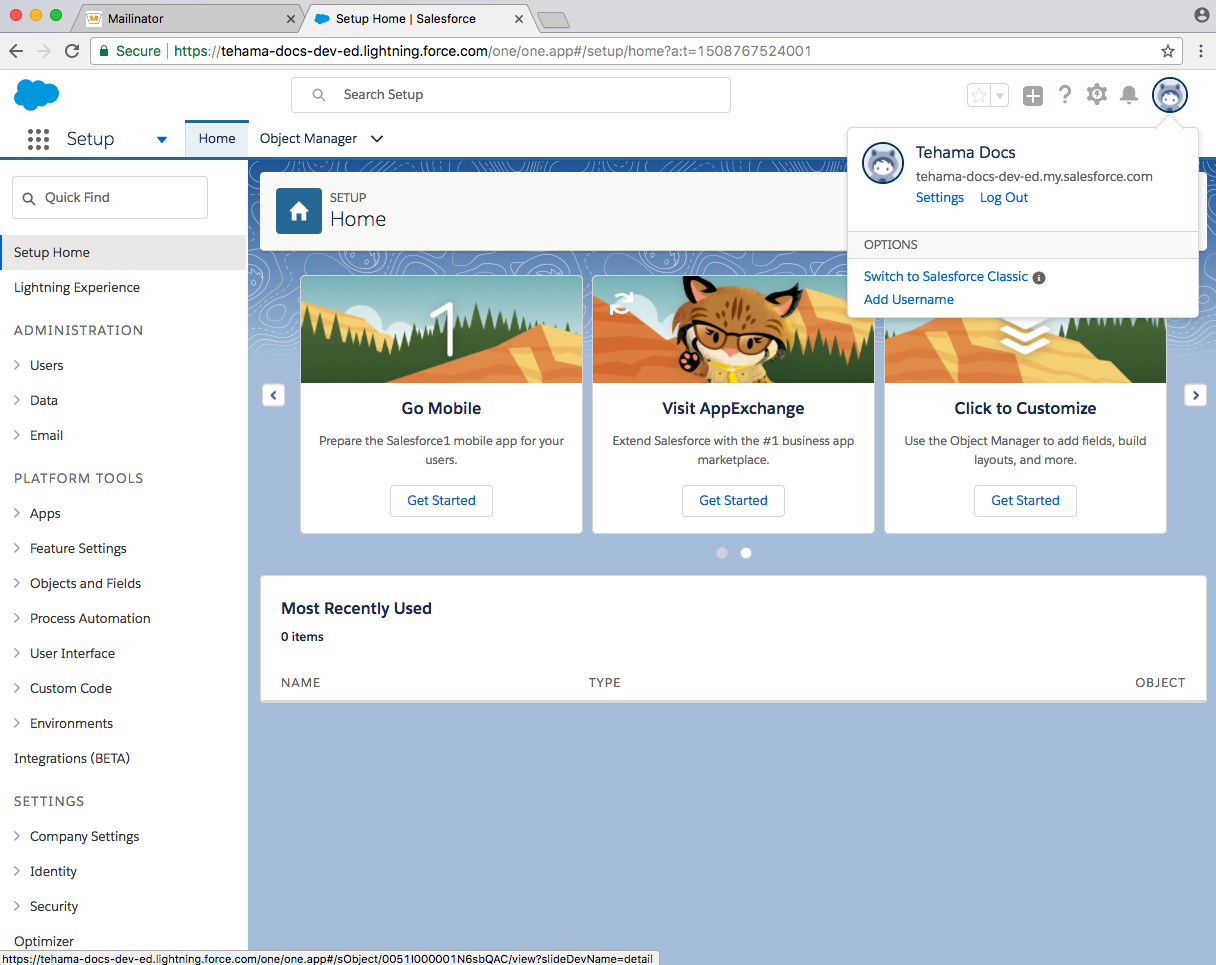
You are now logged in to your new Domain in your Salesforce Developer account.
Set up an Identity Provider in your new Developer Salesforce Domain
Now that you are logged in to your new Domain in your Salesforce Developer Account, you need to set up an Identity Provider (at last!).
- As before, starting from the Setup page, navigate to Identity > Identity Provider.
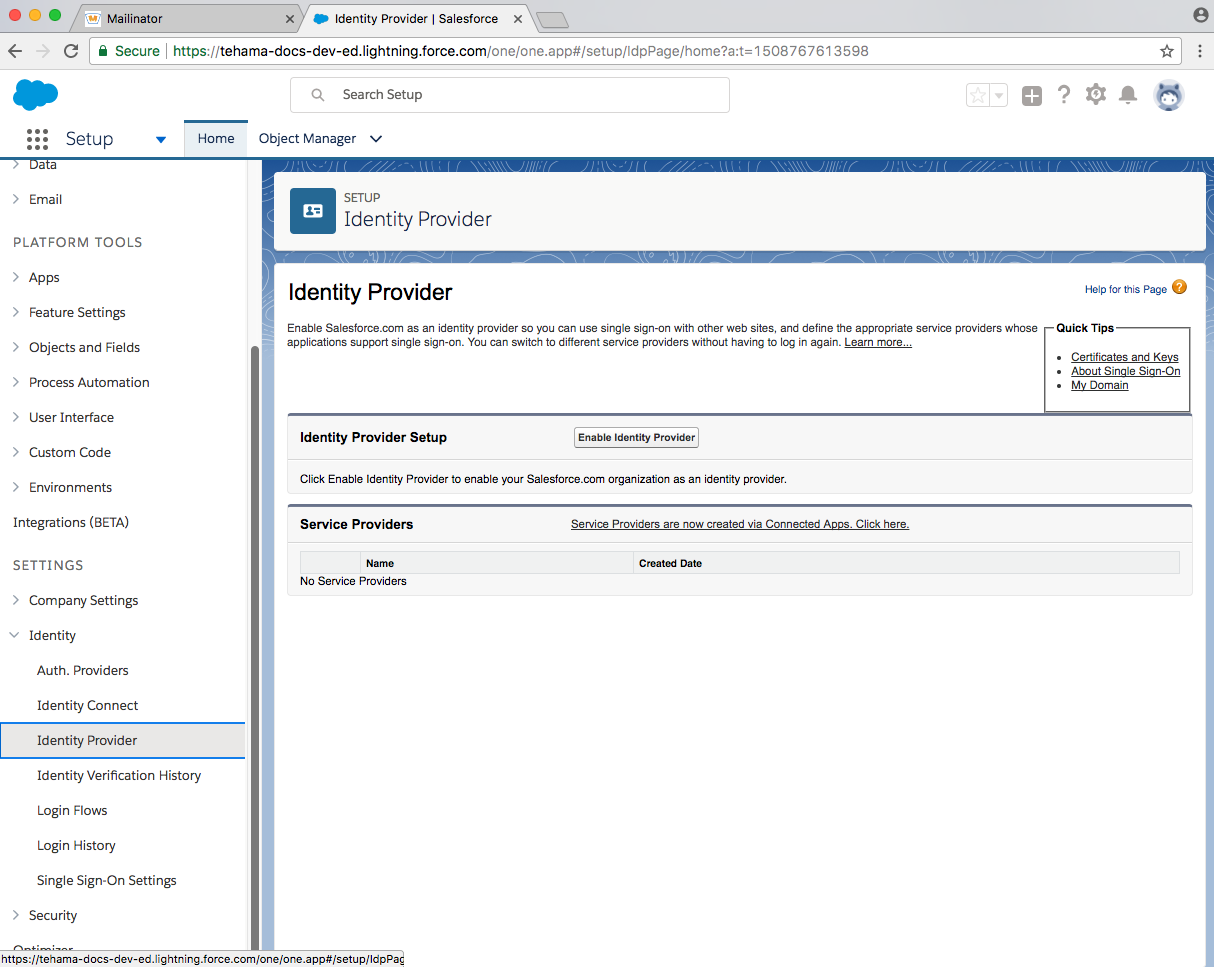
- Click on Enable Identity Provider.
- From the dropdown, select the proposed SelfSigned certificate, then click Save.
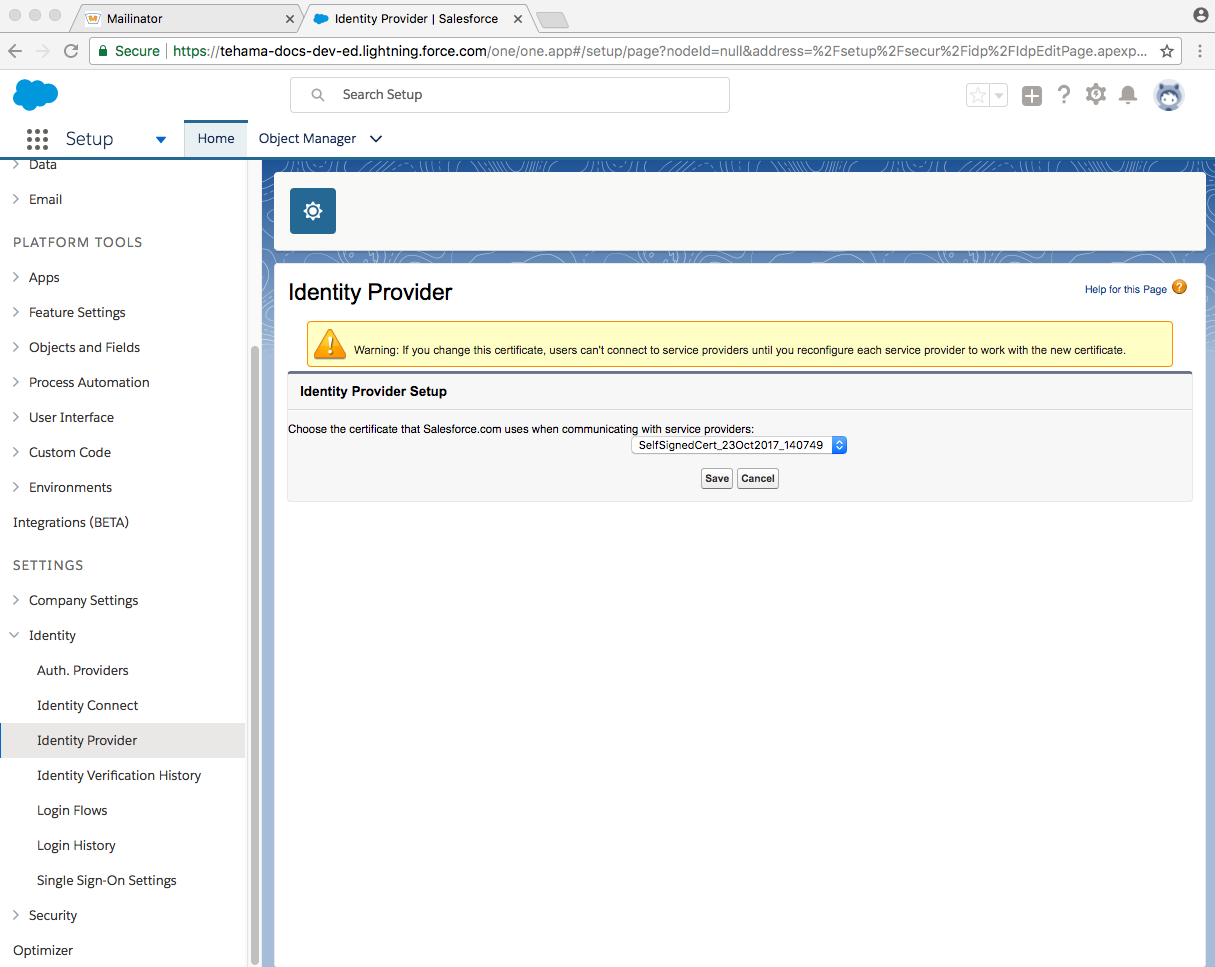
You will now be back on the Identity Provider page with additional details.
Add your Tehama Organization to the Identity Provider as a new Connected App
Now that you have an identity provider enabled, add your Tehama Organization's details to it to set it up as a new Connected App.
-
Still viewing the Identity Provider page in your Developer Salesforce domain, click on Service Providers are now created via Connected Apps. Click here.
-
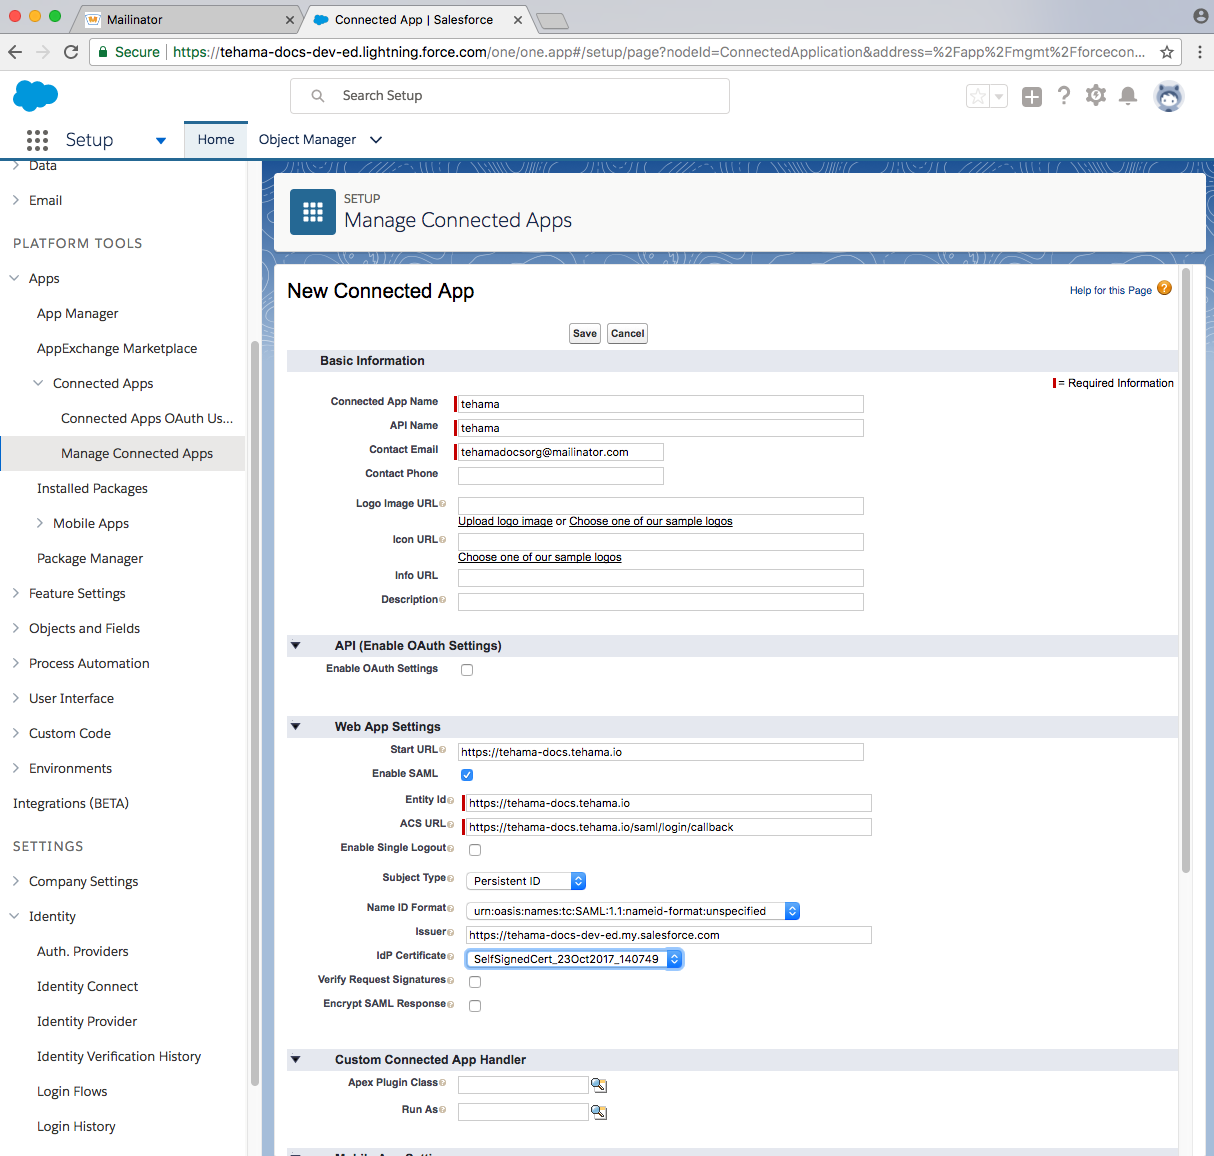
In the "New Connected App" form, enter the following, leave the rest blank or default:
- Connected App Name: tehama
- API Name: tehama
- Contact Email: {your email address that you used to sign up for Salesforce}
- Start URL: {The "Entity ID" from the Tehama tab}
- Enable SAML: {enabled}
- Entity Id: {The "Entity ID" from the Tehama tab}
- ACS URL: {The "Callback URL (Assertion Consumer Service URL)" from the Tehama tab}
- Subject Type: Persistent ID
- Idp Certificate: SelfSignedCert_XXXX
- Click Save.
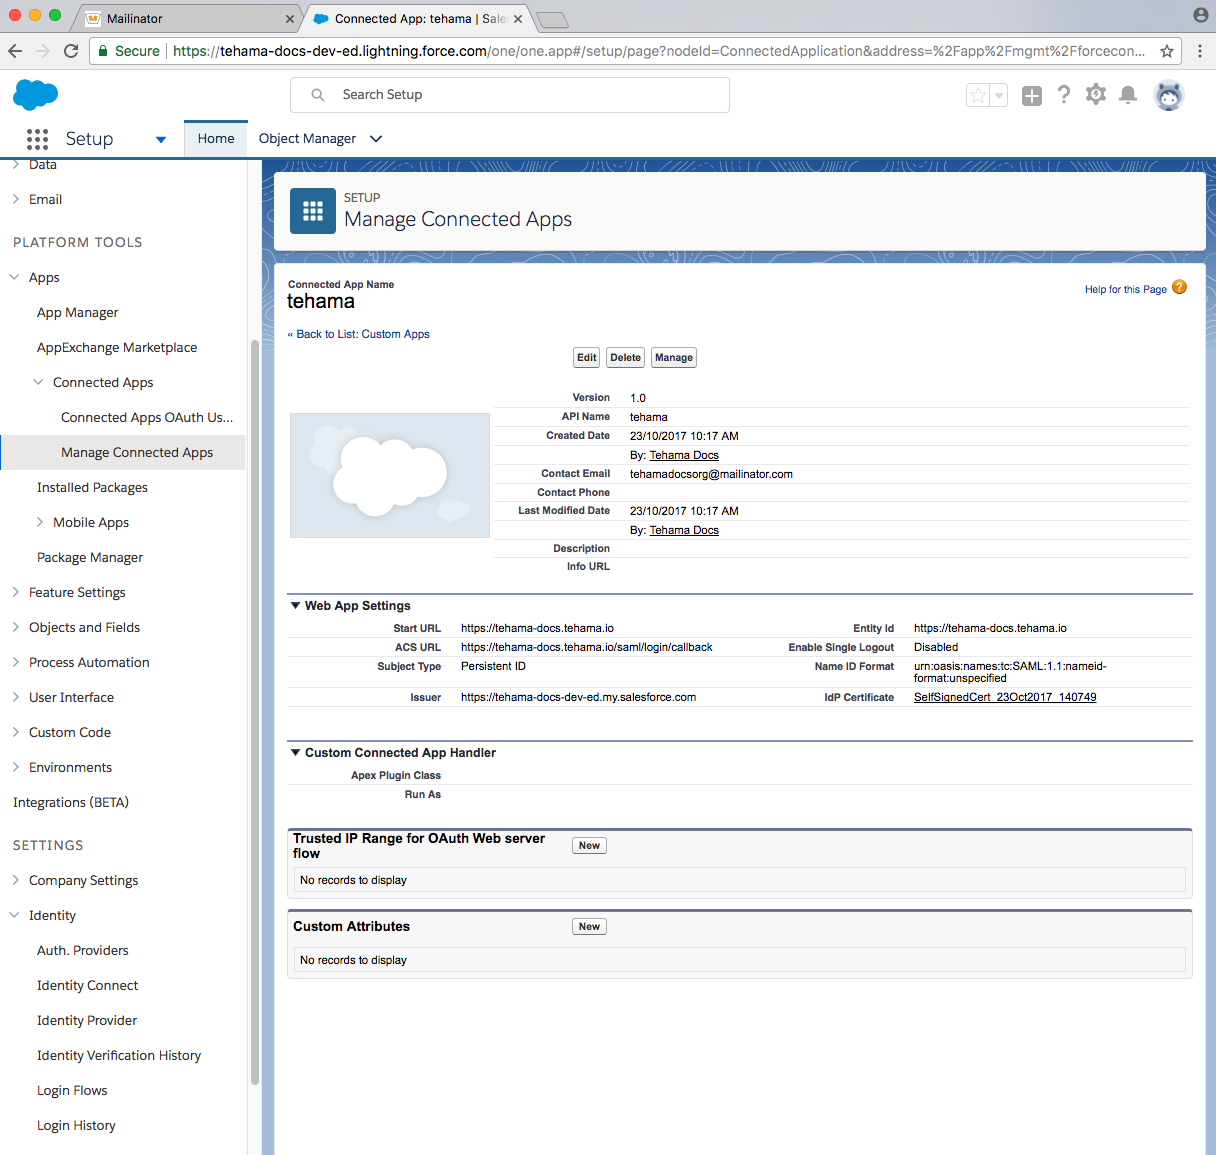
- Click on the Manage button at the top of the page.
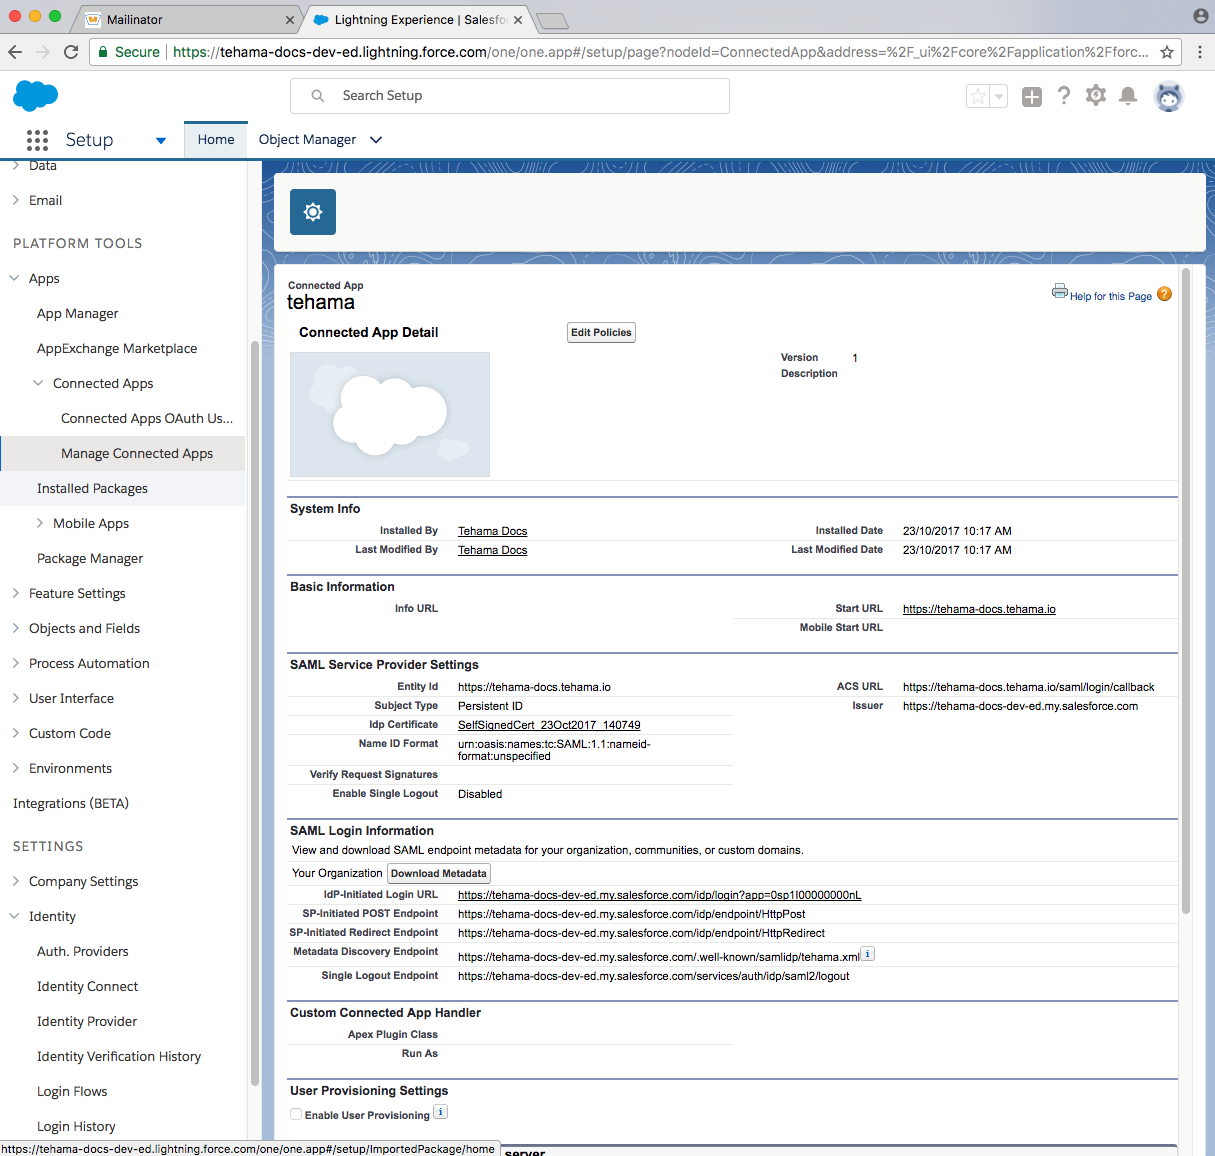
- Click on Download Metadata button found under the "SAML Login Information" section.
- Copy the XML contents of this downloaded file (you will need it to finish the Tehama SSO configuration back in the Corporate Single Sign On (SSO) and User Provisioning page).
- Now go to on Users > Users page.
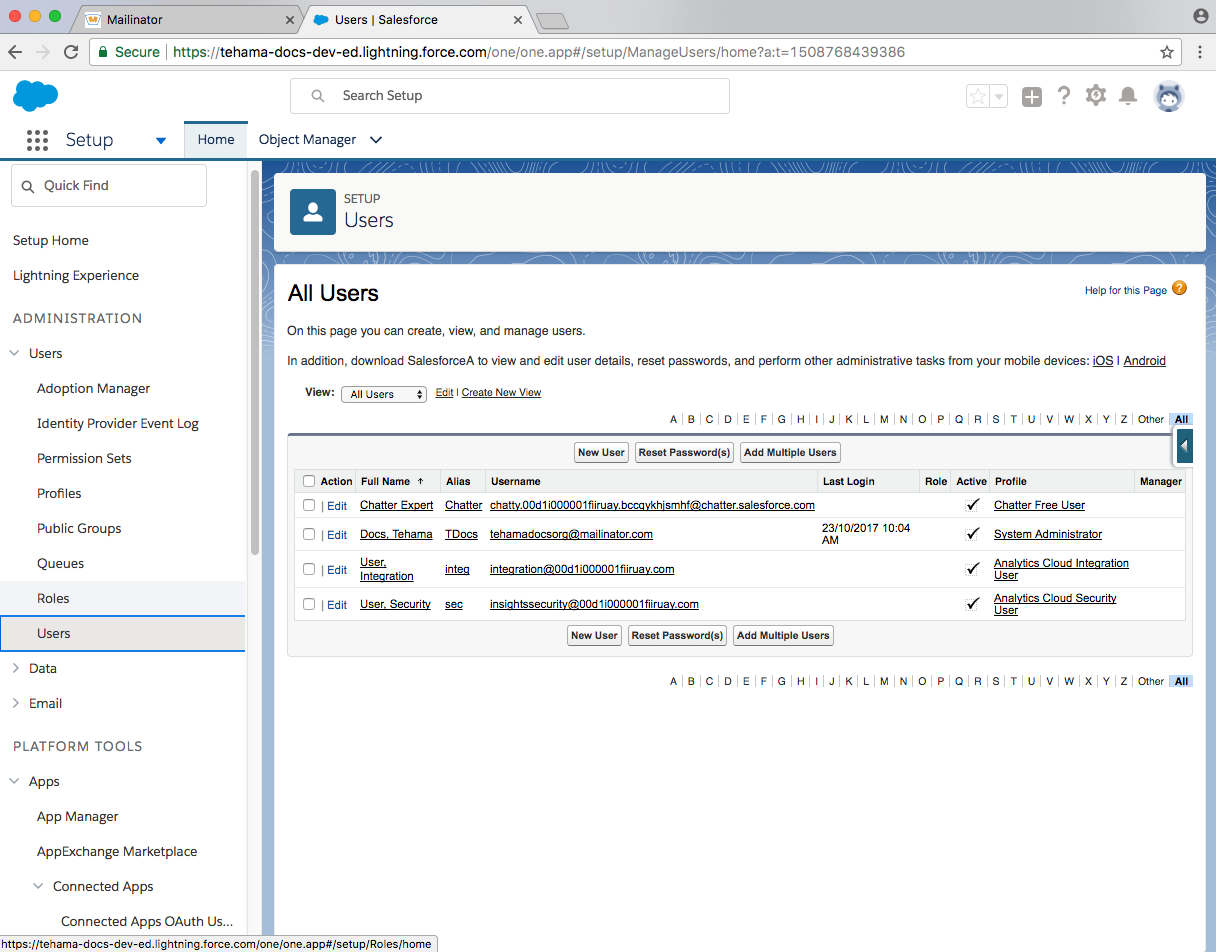
In the list of users, find the user that you are signed in with. It should have the Profile "System Administrator". - Click on the profile link "System Administrator".
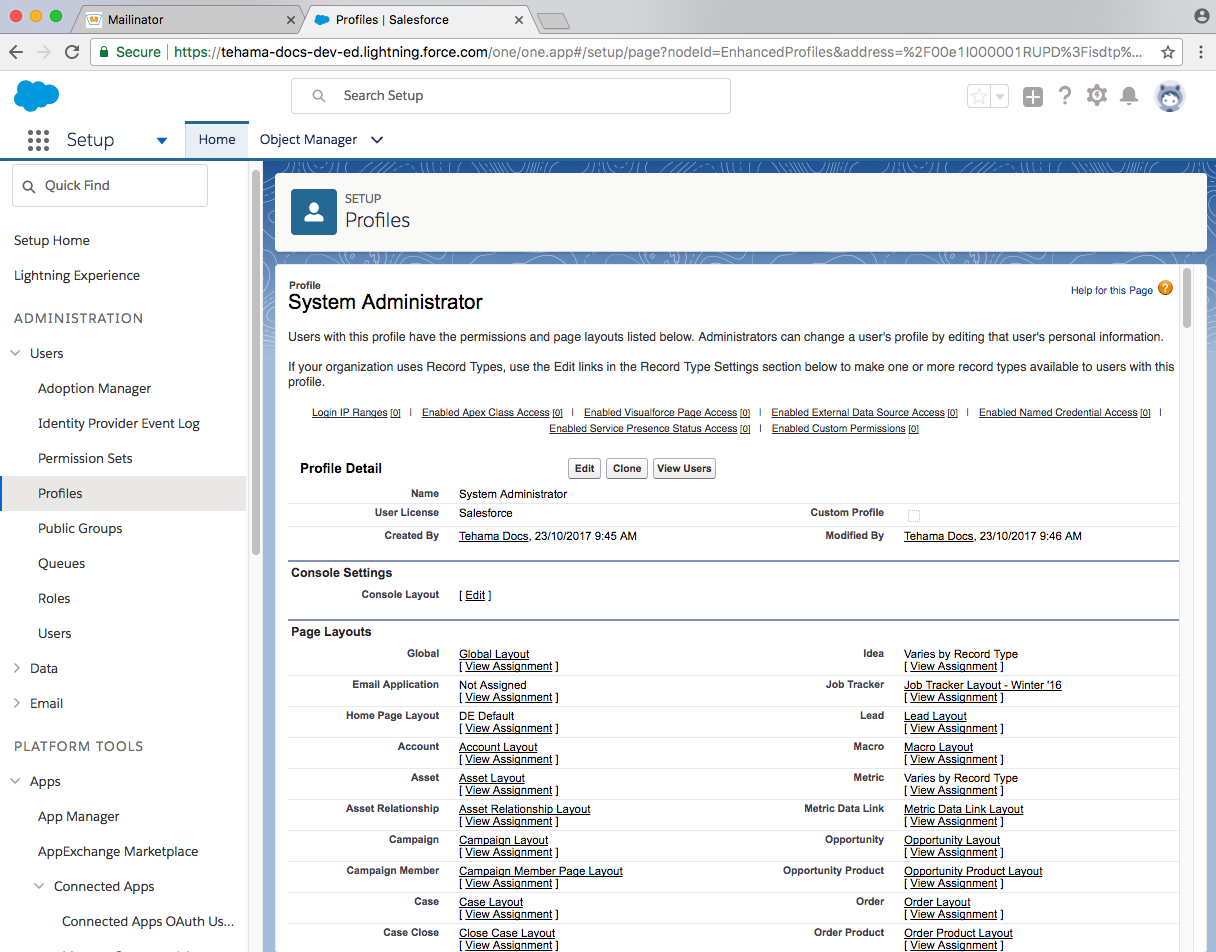
- Click Edit.
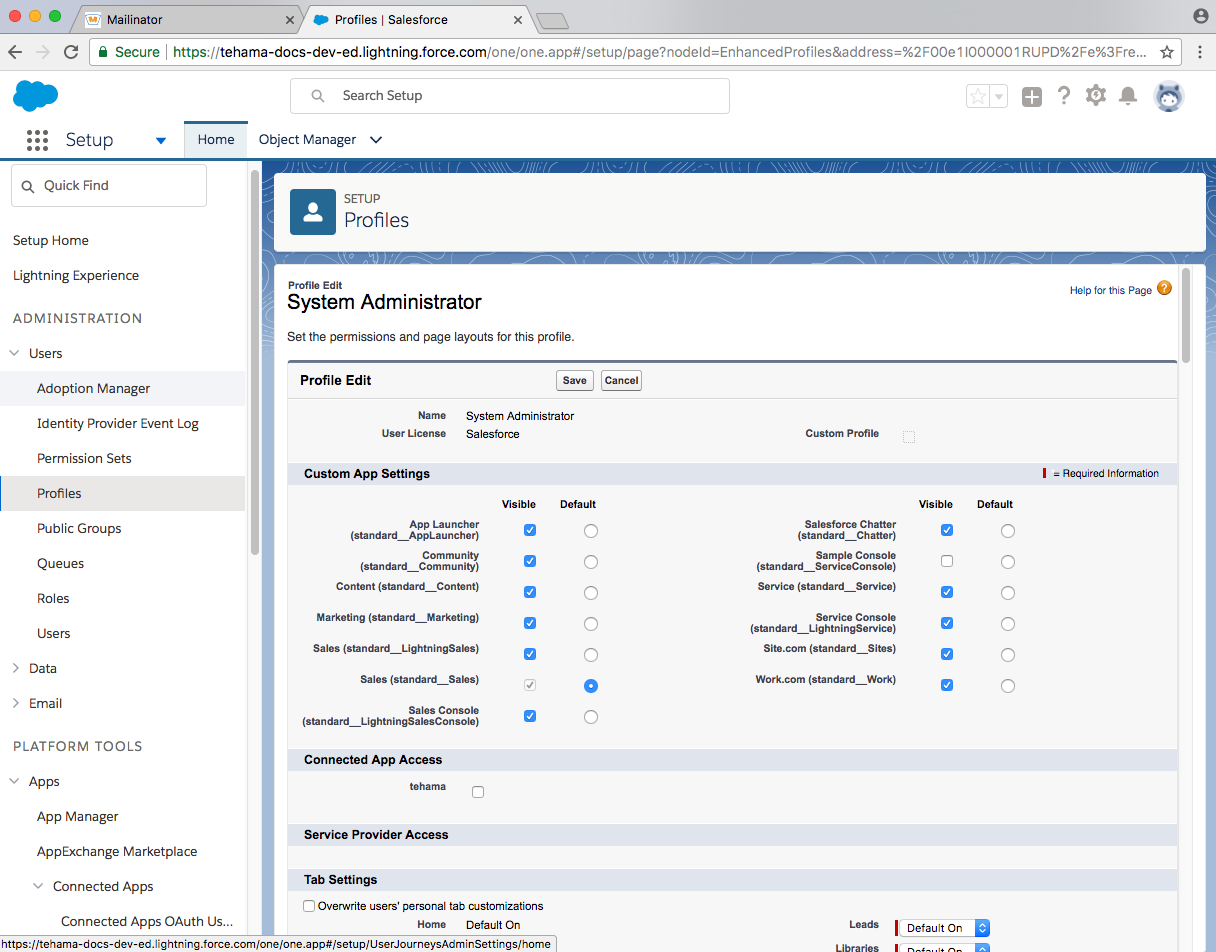
- Go down to "Connected App Access" and check "tehama".
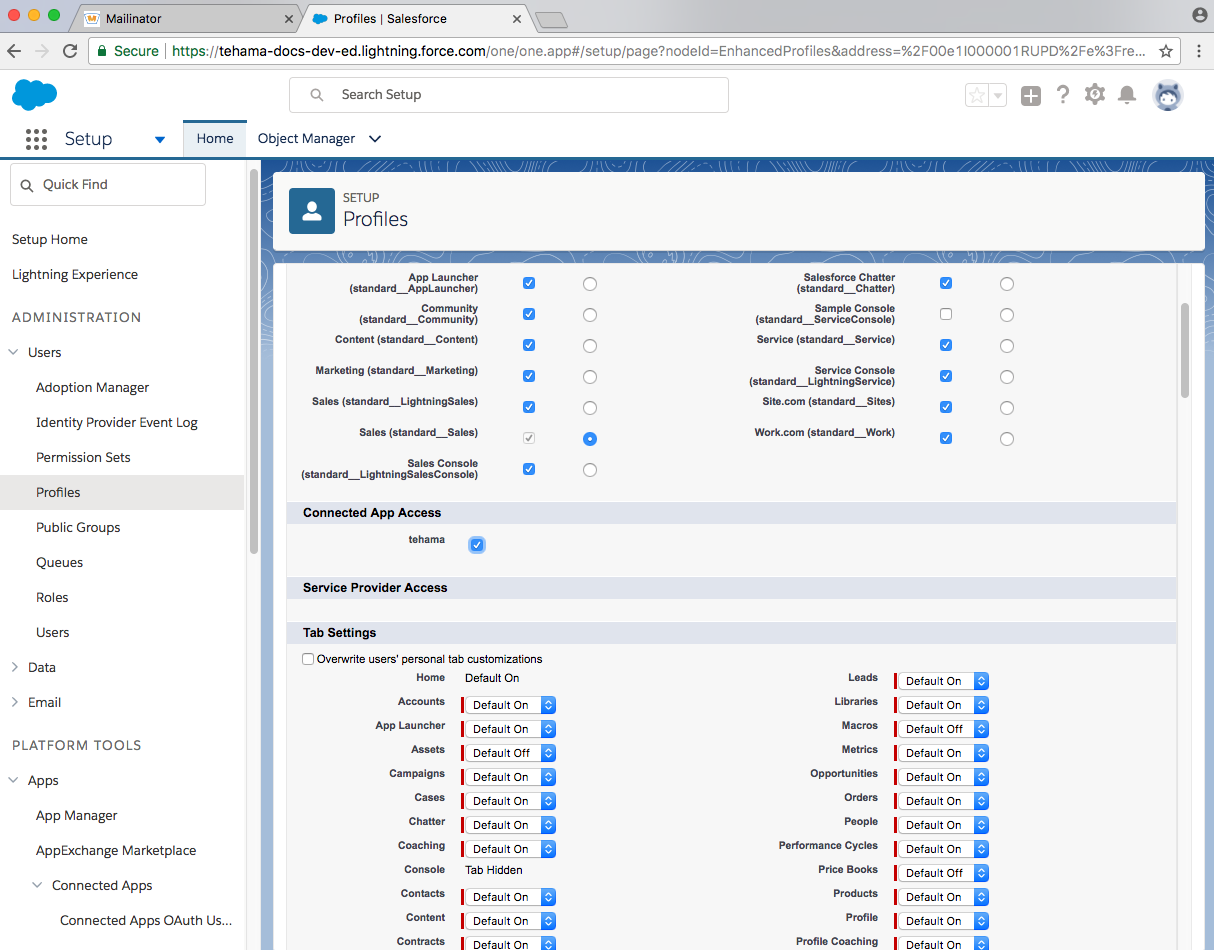
- Press Save.
Enable SAML User Provisioning
Now that you have a Connected App to Tehama, you can configure it to provide user provisioning.
User provisioning sets up a relationship, a mapping, between the Salesforce user profile and the Tehama user profile that enables the following 'auto-provisioning' behaviour:
- Your organization's users can join Tehama without an explicit invitation link.
i.e.: A Tehama user account is automatically created for a user the first time they attempt to log in to Tehama using the credentials of their Salesforce account. Their Tehama account's user profile is populated using values from their Salesforce account's user profile. - Your organization's users can manage their Tehama account's user profile through their Salesforce account.
i.e.: Update the user's information in their Salesforce account's user profile, and it will be automatically updated in their Tehama account's user profile (only for those user profile attributes that are mapped). - Your organization's users can (optionally) be proposed for membership in your organization's Rooms through their Salesforce account.
i.e.: A Tehama-specific attribute can be added to your Salesforce user profile where you can specify Tehama Room ids for Rooms in your Tehama organization for the user to be added to.
There are four parts to setting up user provisioning:
- User Provisioning Part One: Add Custom Attributes to Salesforce's User Profile
- User Provisioning Part Two: Add Values for Custom Attributes in a Salesforce User Account
- User Provisioning Part Three: Add Custom Attributes to your Connected App for Tehama in Salesforce
- User Provisioning Part Four: Map the Connected App's Custom Attributes to the Tehama User Profile in Tehama
User Provisioning Part One: Add Custom Attributes to Salesforce's User Profile
Reason for completing this section (and the next):
This section and the next one show you:
so you can auto-provision the following Tehama-specific attributes found on the Tehama user profile:
- Tehama Default Room IDs: the IDs of the Tehama Rooms the user is automatically put up for membership in 1,2
- Tehama Role: the role taken by the user in Tehama, one of MANAGER or STAFF 3
Auto-provisioning of these two Tehama user attributes is optional.
Without auto-provisioning:
- the Tehama Role attribute will default to STAFF and any changes must be done through Tehama's Web UI; and
- the Tehama Default Room IDs attribute will default to an empty list (e.g.: the user will not be put up for membership in any Rooms.) and Room membership must be managed through Tehama's Web UI.
If you DO NOT want to auto-provision Tehama Role or Tehama Default Room IDS, then skip ahead to User Provisioning Part Three and Part Four.
Otherwise, if you DO want to auto-provision these Tehama user attributes, follow the steps here in Part One and in Part Two first.
Footnotes
- Tehama Default Room IDs is only looked at when the user's Tehama account is first created. For example, if this attribute has value '2,7' when the user's Tehama account is created, then the user will be added to the Room with ID 2 and the Room with ID 7 within your organization. ↩
- Tehama Default Room IDs is used to propose the user for Room memberships. If a Room has auto-approvals enabled, then the user will be added to that Room automatically. Otherwise, the user's proposed membership must be manually approved by the connected organization for the Room from the Tehama Web UI before the user is added to the Room. ↩
- Tehama Role is used to provision only the 'Org Manager' (MANAGER) and 'Staff' (STAFF) roles in Tehama. If you have Custom Roles & Permissions enabled for your organization, and you have added the Role attribute in the Tehama Web UI as a custom SAML attribute, (or if you have "SAML and SCIM" enabled), you will see the "Acknowledgment: Authentication and Custom Roles & Permissions" checkbox in the Tehama Web UI. You must place a checkmark in this checkbox, to acknowledge that all role setting must be done within Tehama from this point on. Aside from initial provisioning, the roles set within the identity provider will no longer be communicated to Tehama. Read the section Custom Roles & Permissions and SSO User Provisioning in the Corporate Single Sign On (SSO) Authentication and User Provisioning page for more information. ↩
Steps for part one:
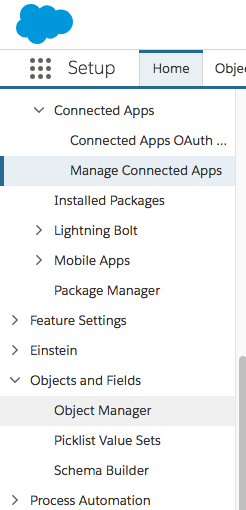
Log into your Salesforce account and go into Setup. Select Objects and Fields from the sidebar menu. Then select Object Manager.
This will bring you to the Object Manager page. (The sidebar menu will disappear.)

Click on the User object, then click on Fields & Relationships.
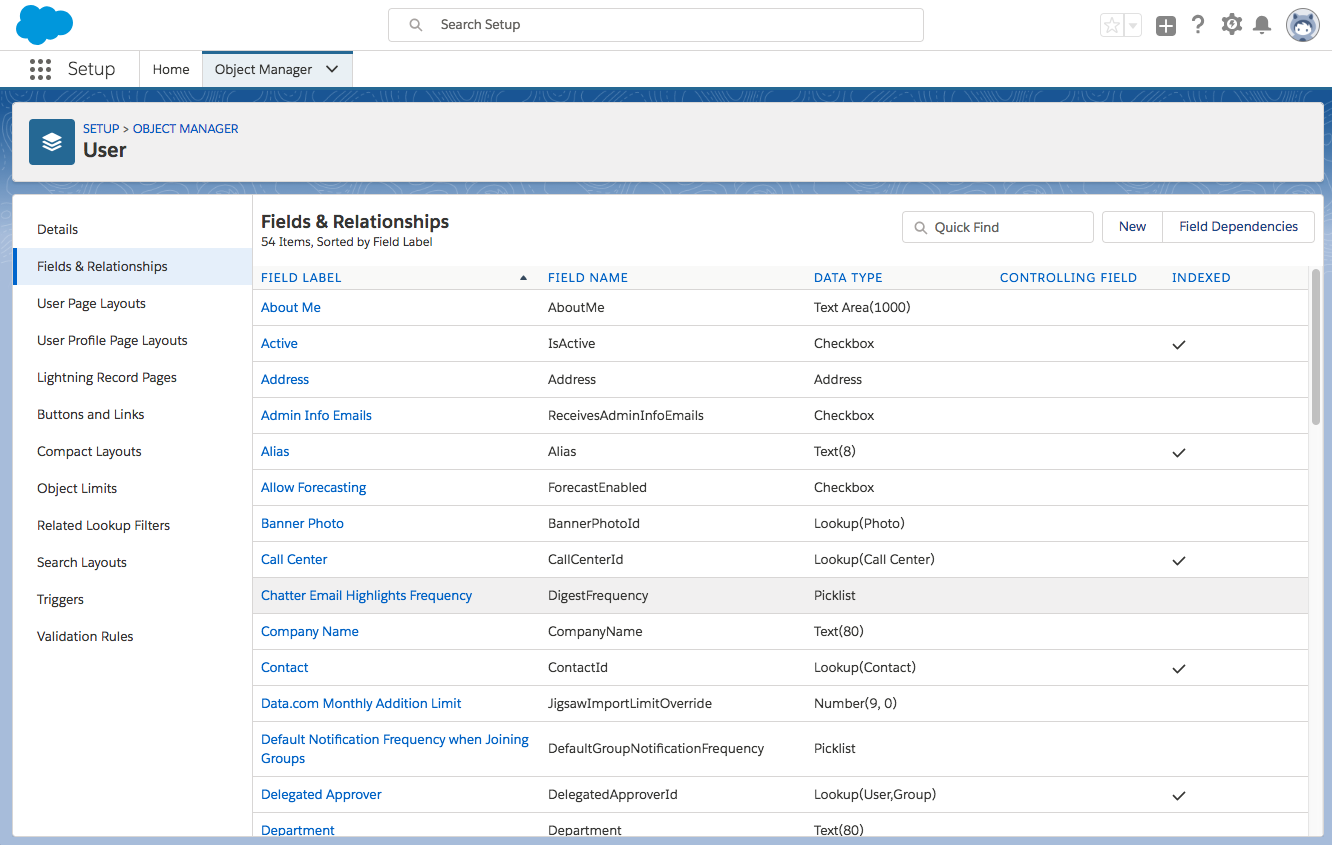
From here you can add your custom attributes, Tehama Role and Tehama Default Room IDs.
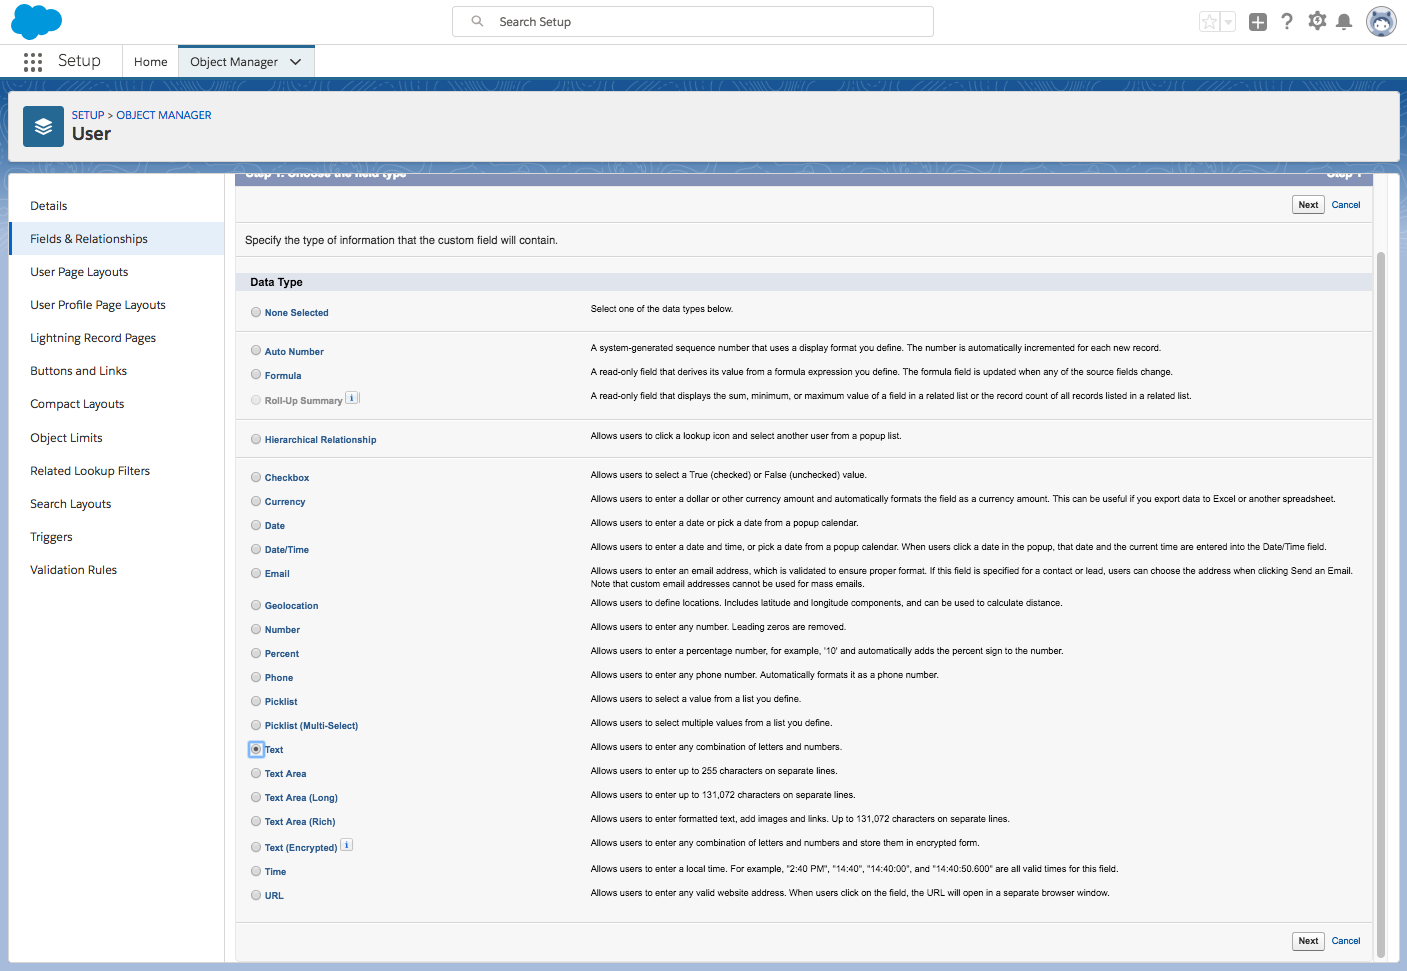
Click New and then select Picklist.
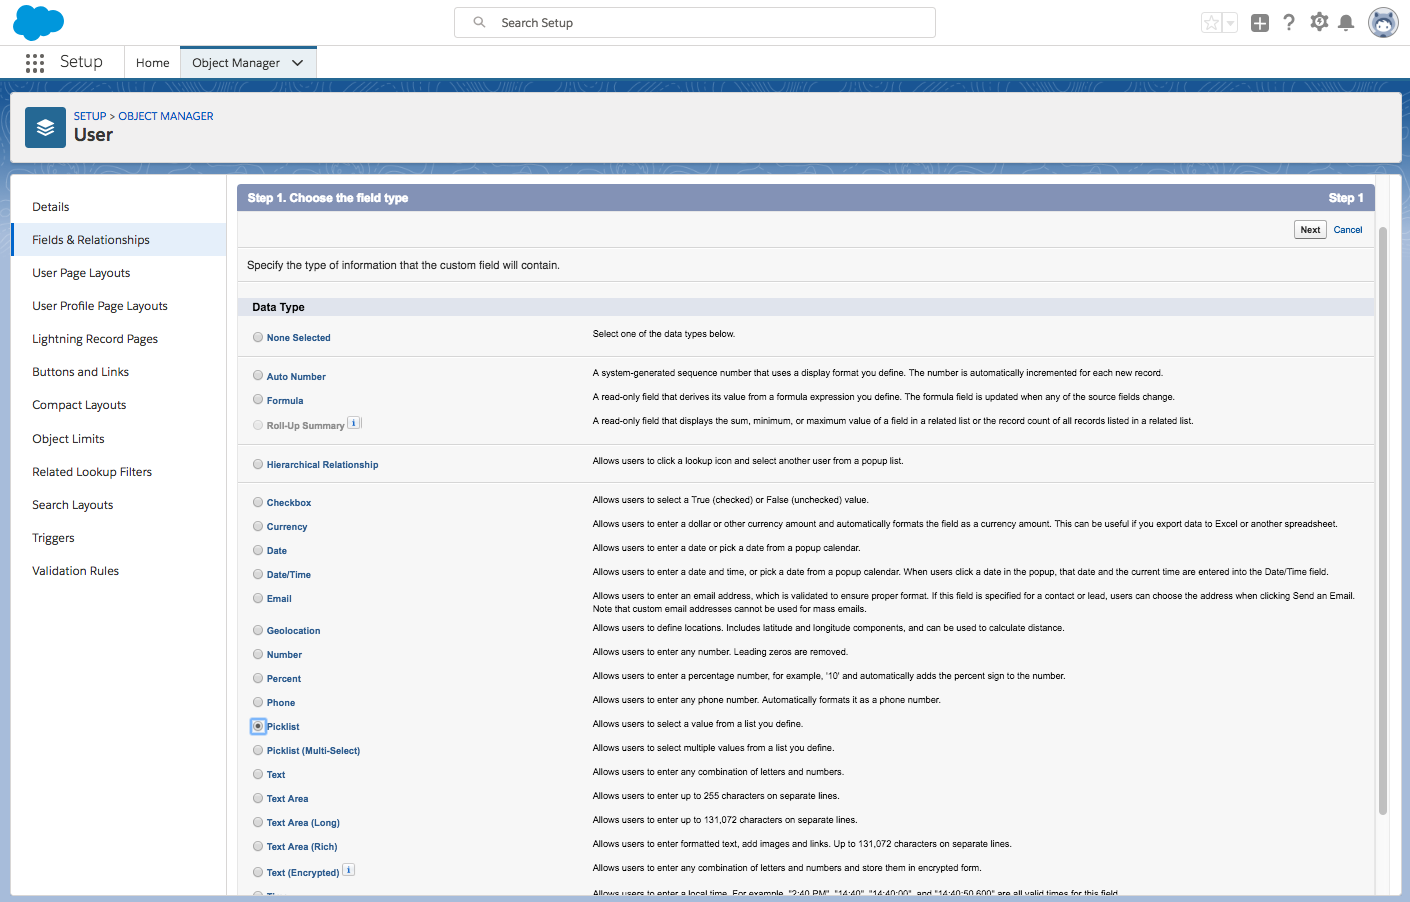
Click NEXT. You will see the Enter the details page.
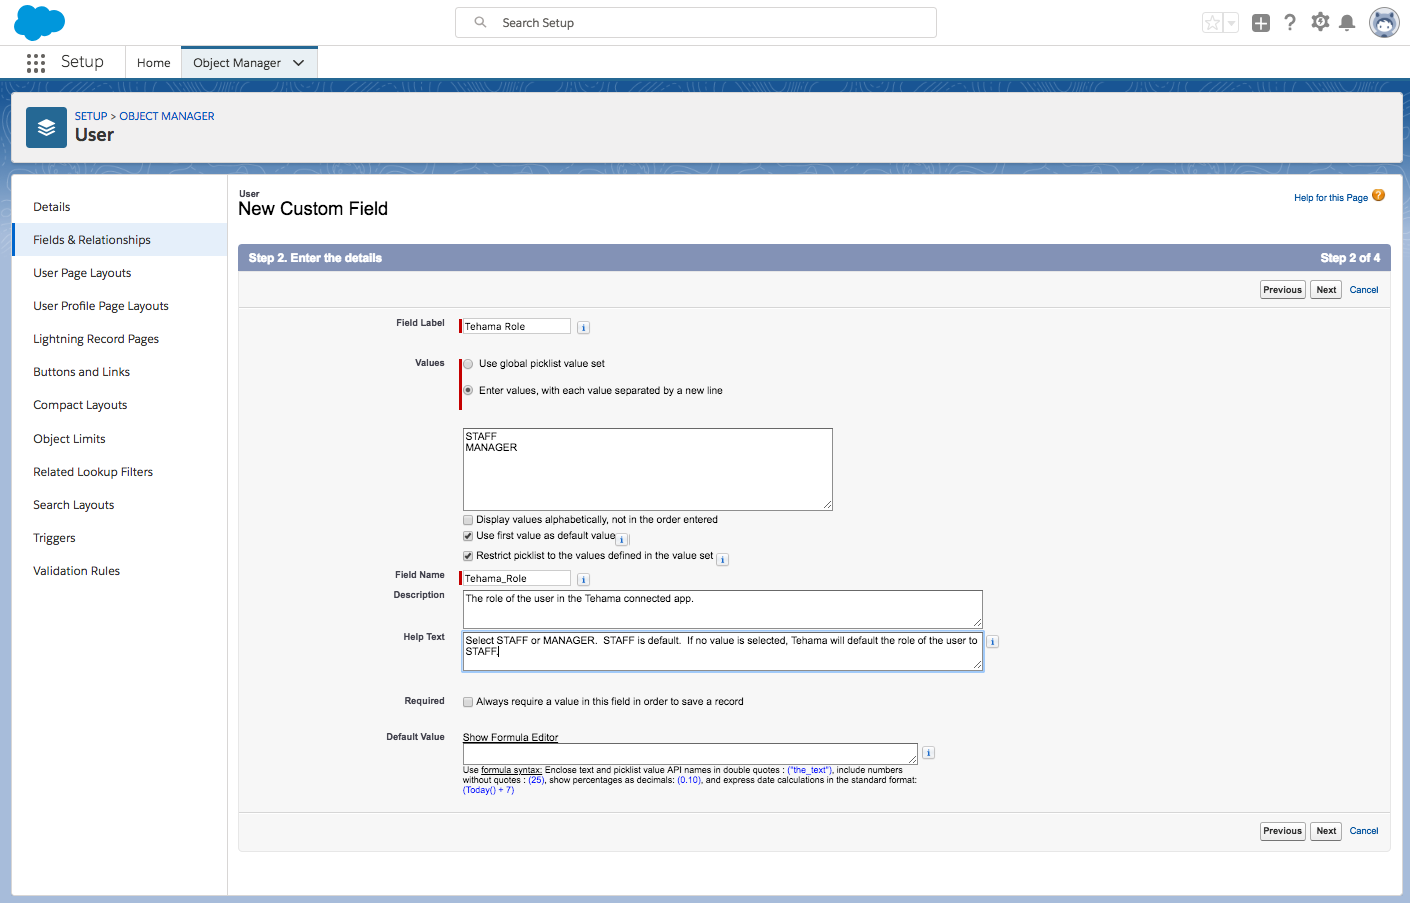
- Enter "Tehama Role" in the Field Label field.
- Select the "Enter values, with each value separated by a new line" option and enter STAFF and MANAGER, on separate lines, in that order, in the text box.
- Disable "Display values alphabetically, not in the order entered".
- Enable "Use first value as default value".
- Enable "Restrict picklist to the values defined in the value set".
- Enter "Tehama_Role" in the Field Name field.
- Optionally enter a description in the Description field.
- Optionally enter help text in the Help Text field.
- Disable "Always require a value in this field in order to save a record".
- Leave the Default Value field blank.
Click Next.

Ensure that the new field will be visible to the Standard User. (Make sure checkbox under the Visible column for the "Standard User" row is checked.)
Click Next.
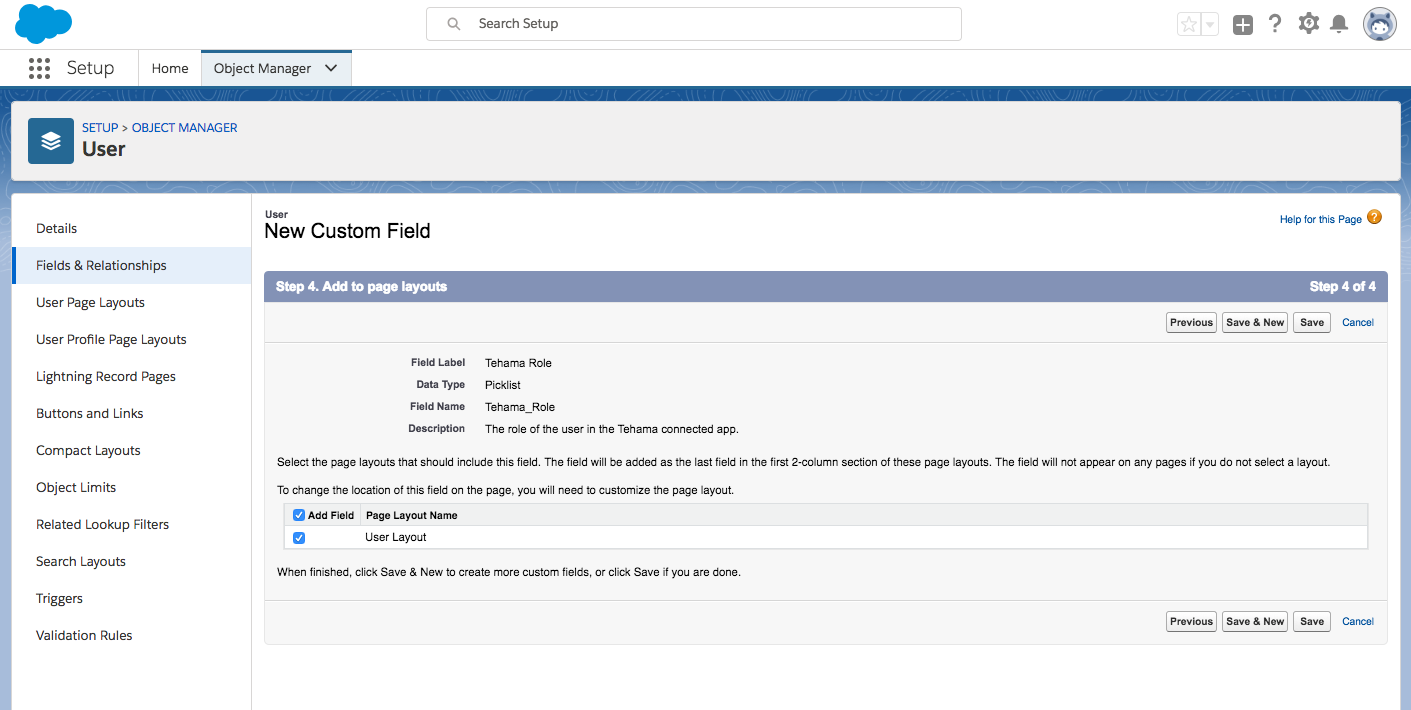
Enable "User Layout".
Click Save. You have now added the Tehama_Role attribute to Salesforce's user profile.
(From the Fields and Relationships page)
Click New and then select Text.
Click NEXT. You will see the Enter the details page.
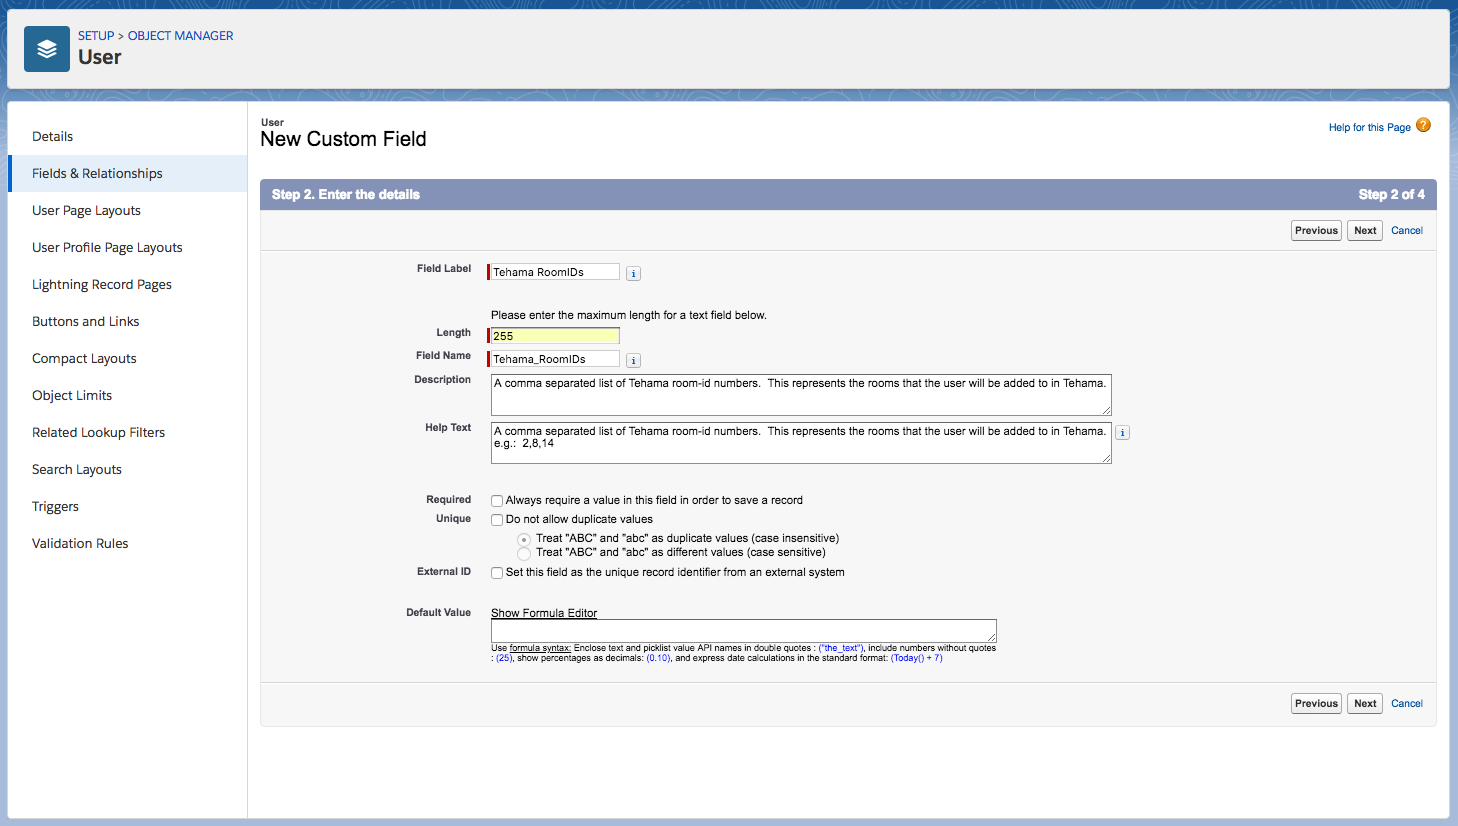
- Enter "Tehama RoomIDs" in the Field Label field.
- Enter "255" in the Length field.
- Enter "Tehama_RoomIDs" in the Field Name field.
- Optionally enter a description in the Description field.
- Optionally enter help text in the Help Text field.
- Disable "Always require a value in this field in order to save a record".
- Disable "Do not allow duplicate values".
- Disable "Set this field as the unique record identifier from an external system".
- Leave the Default Value field blank.
The value of the Tehama RoomIDs attribute is a comma separated values (CSV) list of IDs of Rooms in your Tehama organization.
Click Next.
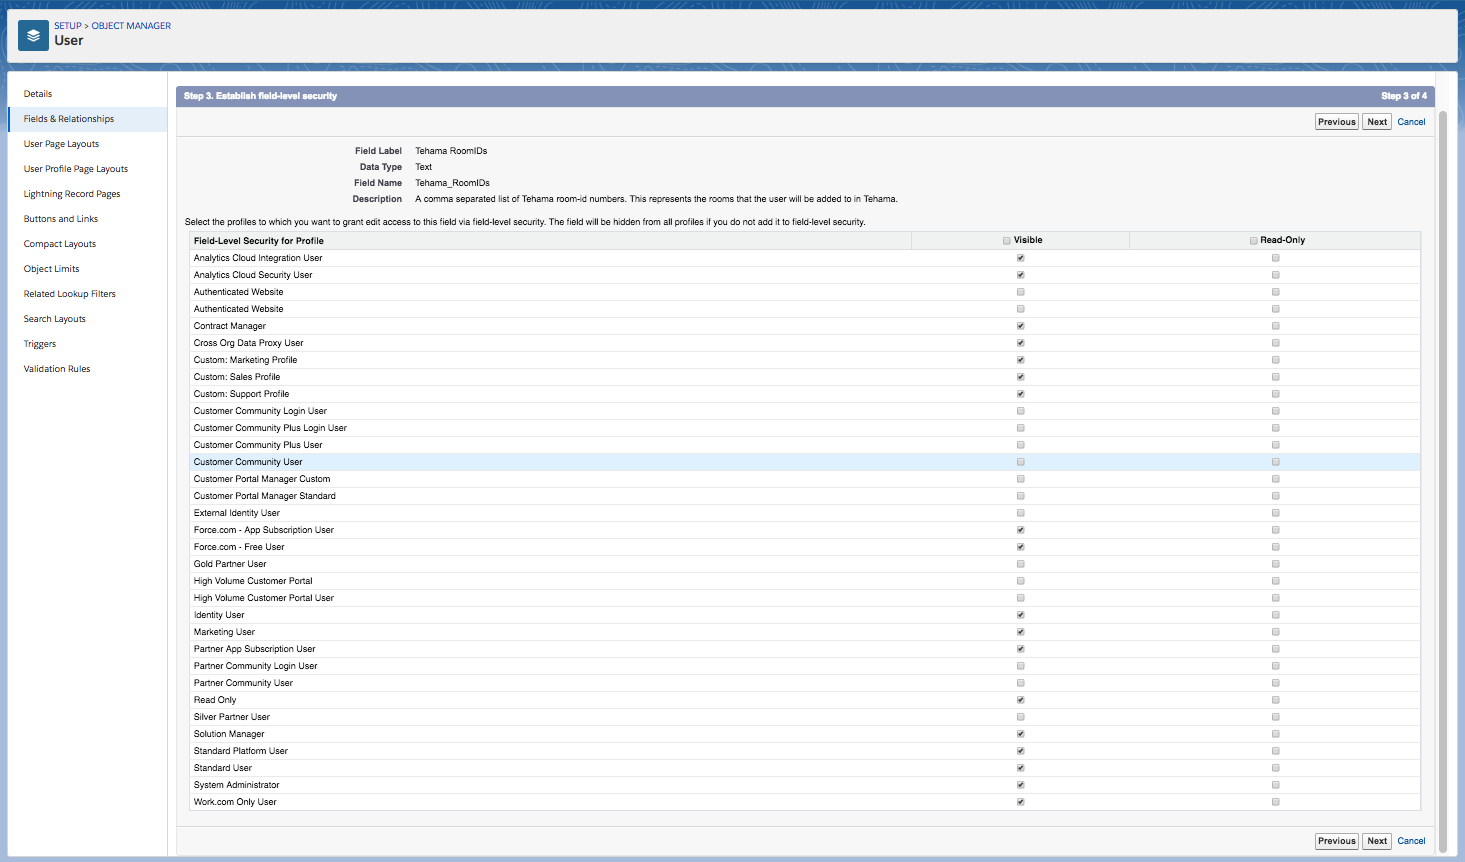
Ensure that the new field will be visible to the Standard User. (Make sure checkbox under the Visible column for the "Standard User" row is checked.)
Click Next.
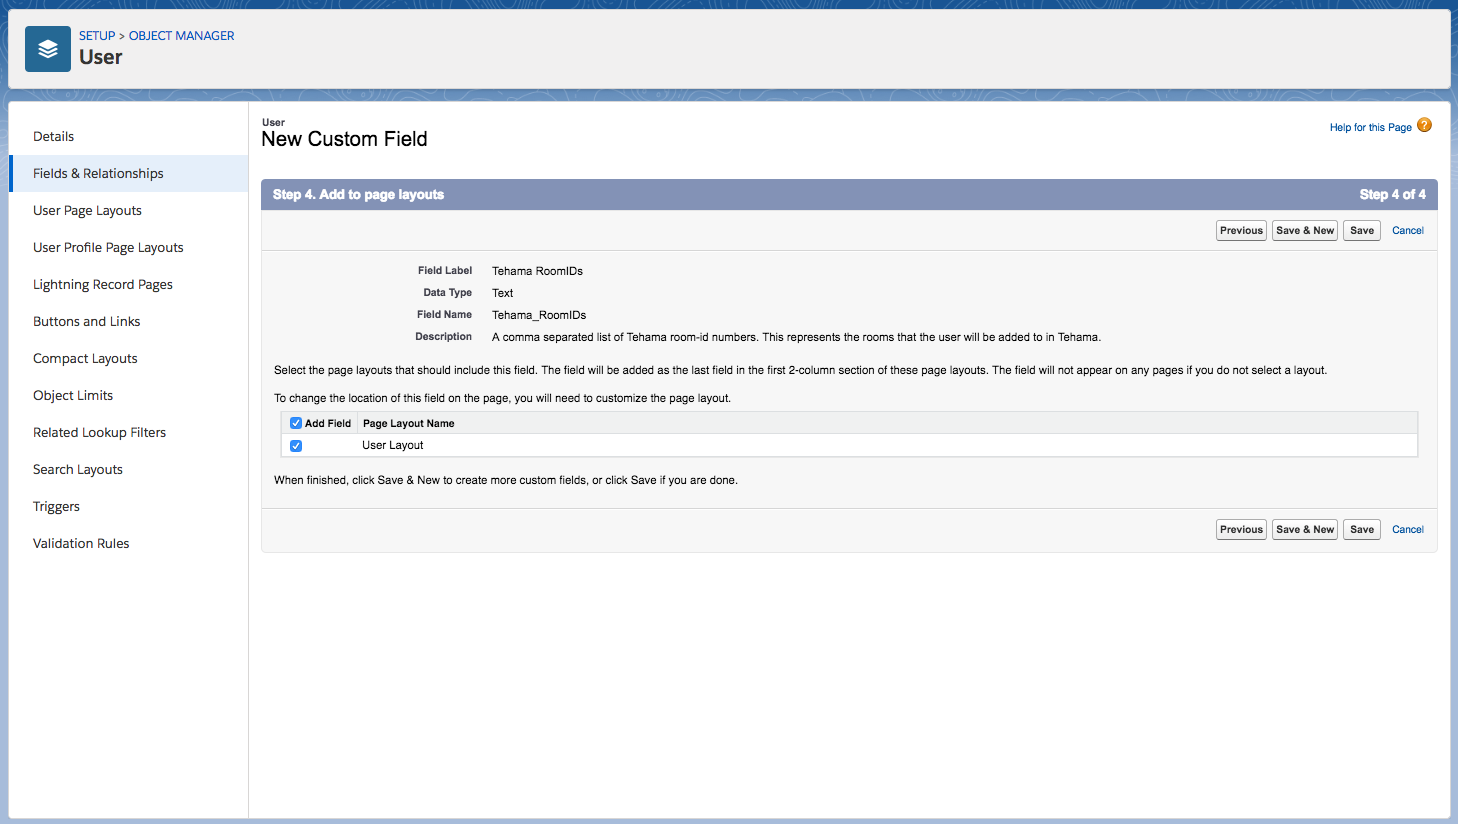
Enable "User Layout".
Click Save. You have now added the Tehama_RoomIDs attribute to Salesforce's user profile.
User Provisioning Part Two: Add Values for Custom Attributes in a Salesforce User Account
Reason for completing this section:
This section shows you how to assign values to custom attributes in Salesforce's user profile for individual users - namely, the custom attributes Tehama Role and Tehama Room IDs.
See the reason for completing Part One. Only complete this section if you completed Part One. Otherwise, move on to Part Three.
Steps for part two:
Log into your Salesforce account and go into Setup. Select Users from the sidebar menu. Then select Users. This will bring you to the Users page.
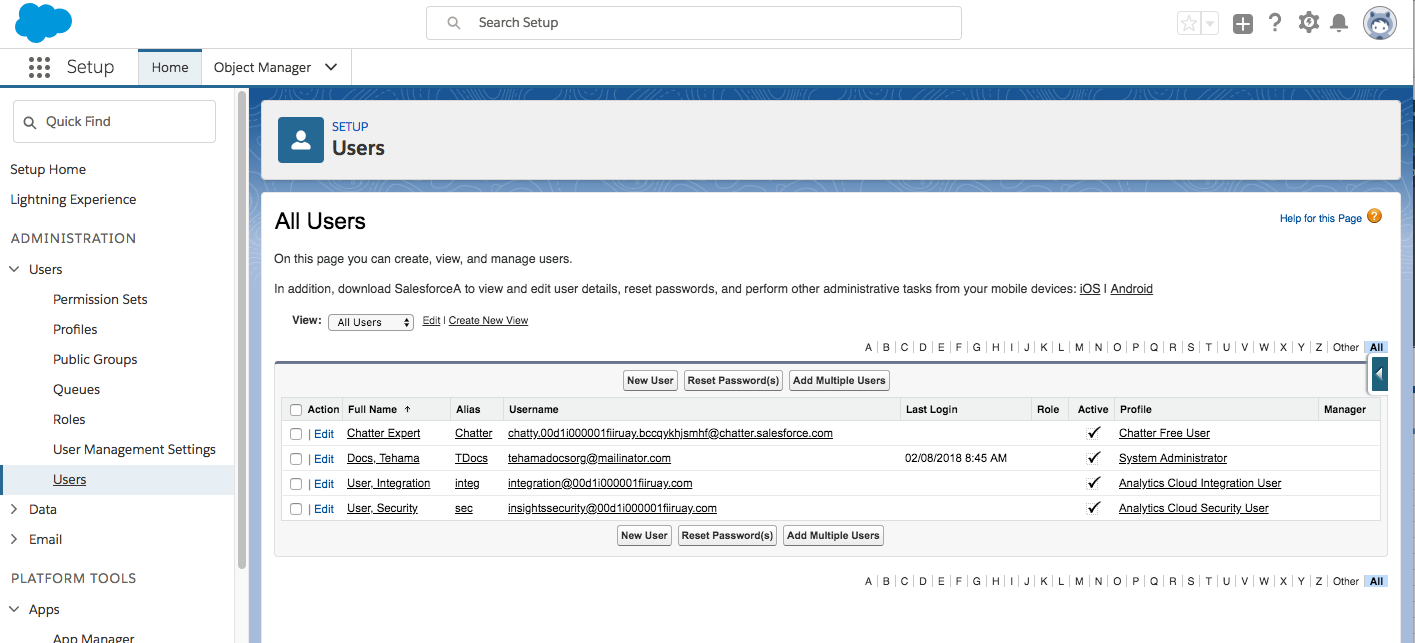
Click Edit next to the name of the user you wish to edit. Scroll down until you see the Additional Information section, which contains the "Tehama Role" and "Tehama RoomIDs" attributes.
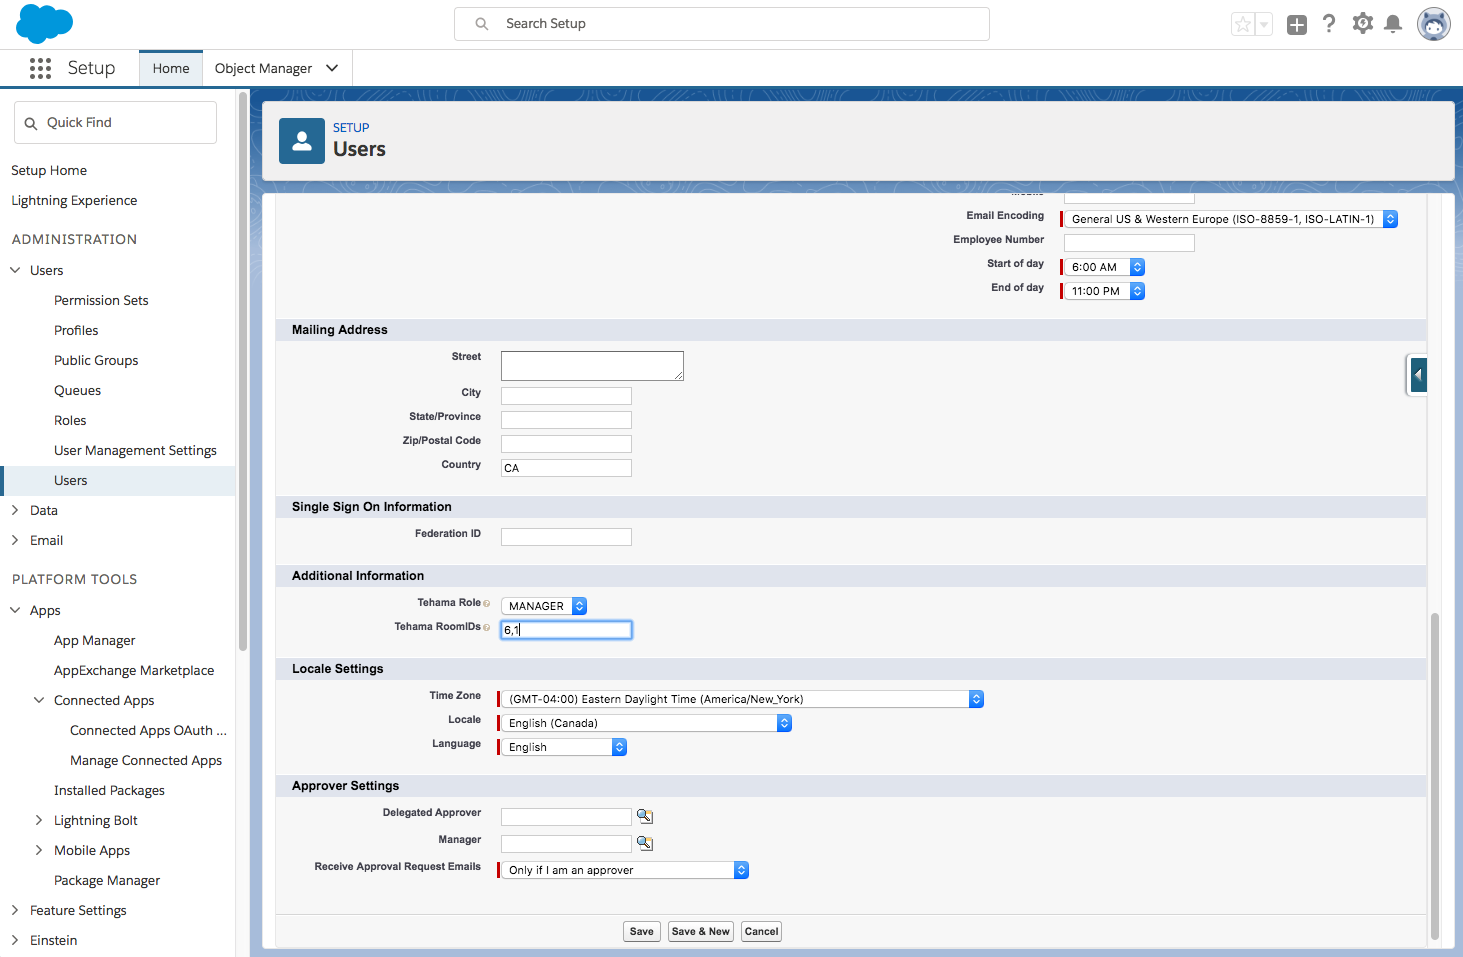
Add values to those attributes.
- For "Tehama Role", this is simply selecting either "MANAGER" or "STAFF" from the picklist.
- For "Tehama RoomIDs", this requires you to compose a comma separated value string (CSV) of Tehama Rooms ids. See the section entitled Find Room IDs in User Provisioning Part Four below.
Click Save.
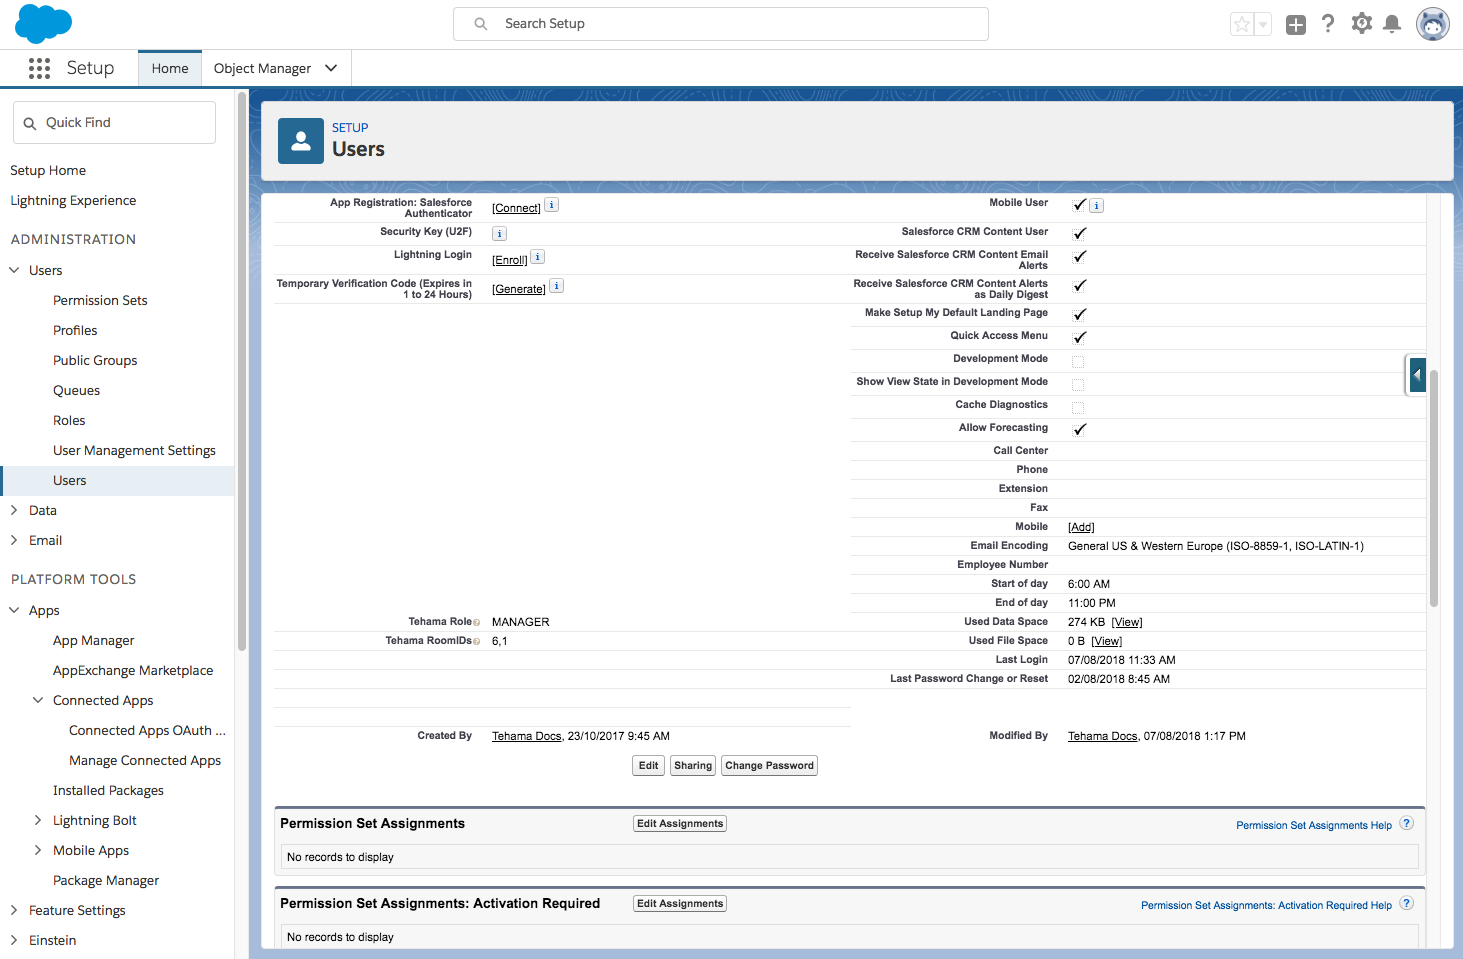
To see the values of those attributes, click on the Full Name of the user.
User Provisioning Part Three: Add Custom Attributes to your Connected App for Tehama in Salesforce
Reason for completing this section:
This part is where you make the link between Salesforce's user profile attributes and your connected app for Tehama.
Add custom attributes to your connected app for Tehama, mapping them to the attributes in the Salesforce User Profile.
Steps for part three:
Log into your Salesforce account and go into Setup. Select Connected Apps from the sidebar menu. Then select Manage Connected Apps. This will bring you to the Manage Connected Apps page.
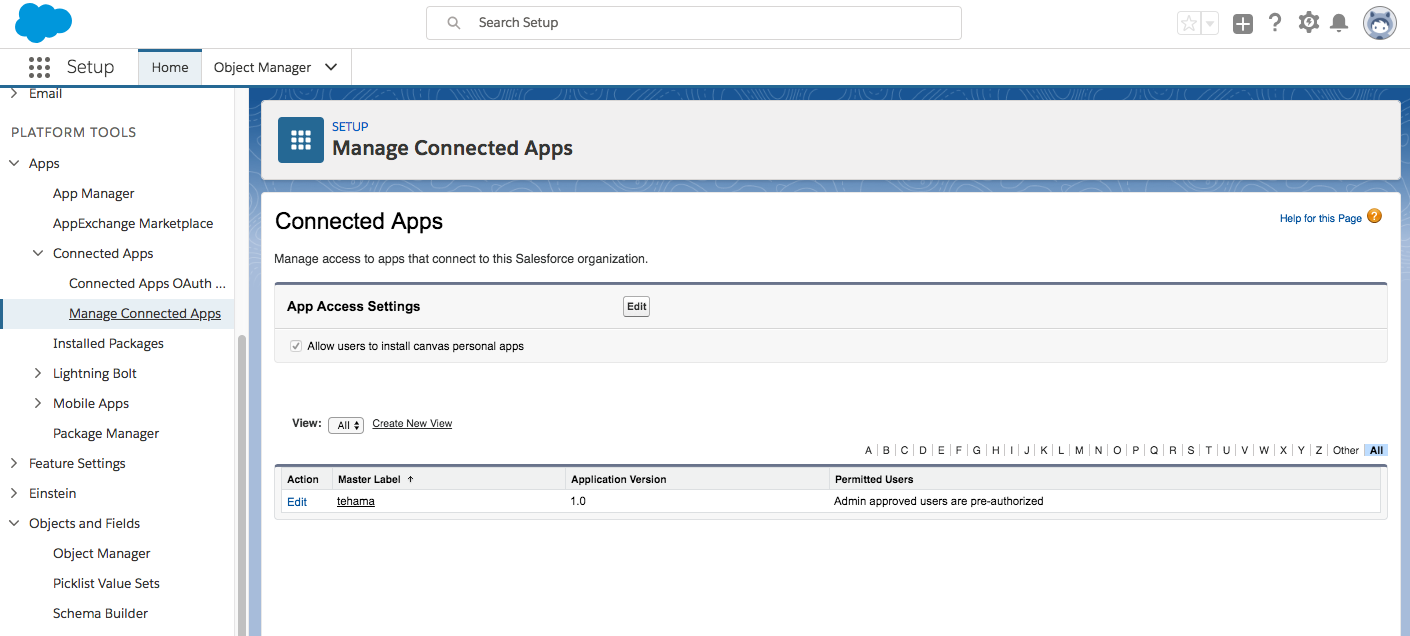
Click on the Master Label of your connected app for Tehama.
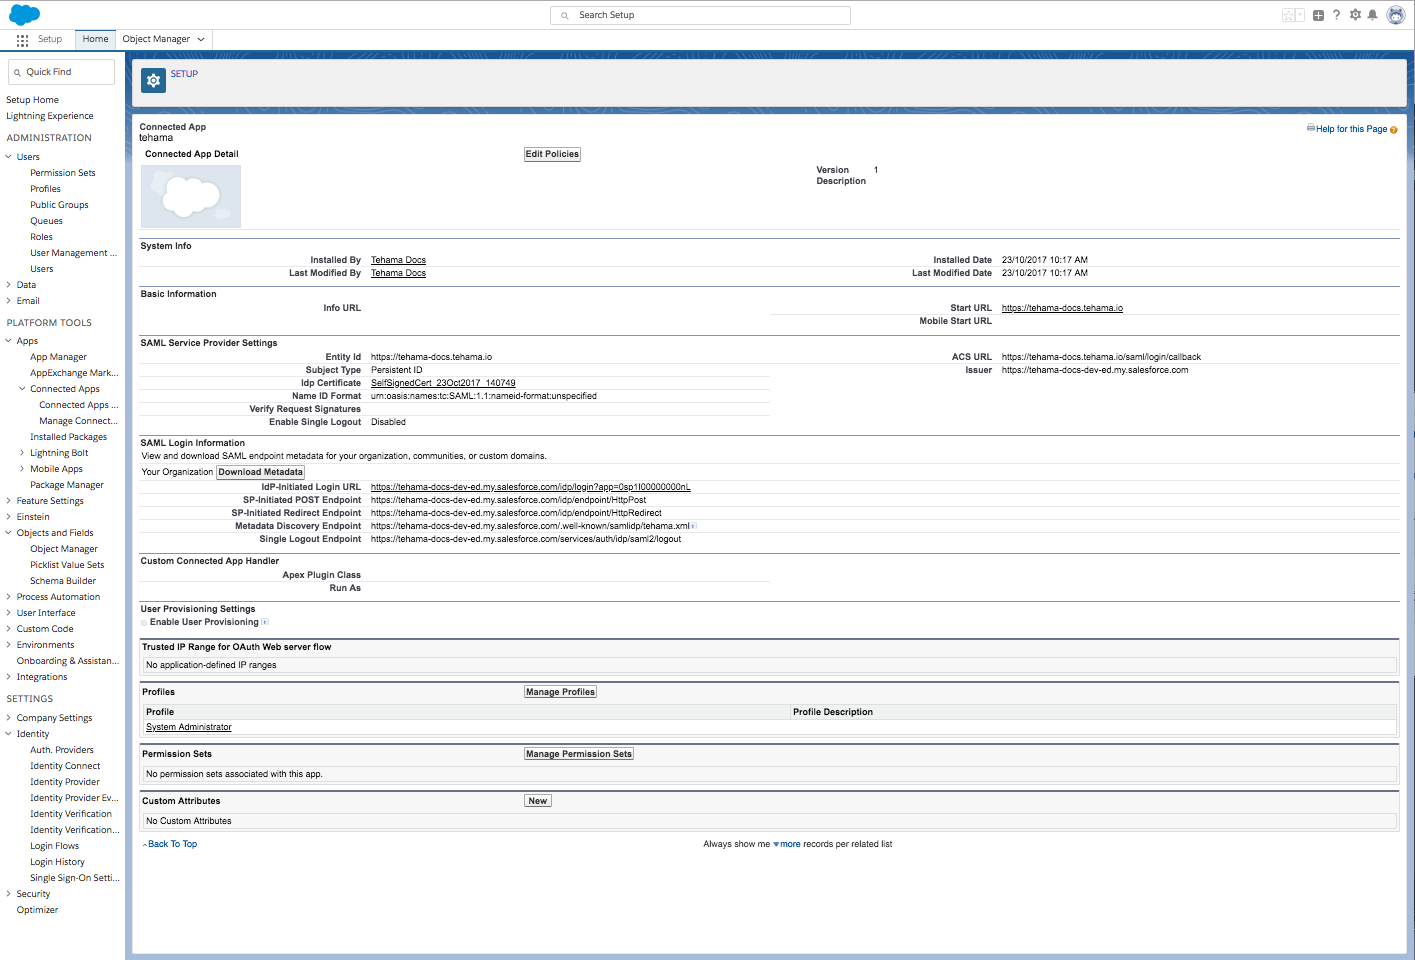
Scroll to the Custom Attributes section. Click New. This will bring you to the Create Custom Attribute page.
- Enter the name of your new custom attribute in the Attribute key field.
- Beside the Attribute value field, click Insert Field. A dialog will pop up with a list of the various Salesforce objects.
- Select $User >.
- Scroll through the list of user profile attributes and select the appropriate one for your new custom attribute. See the list below for pairings.
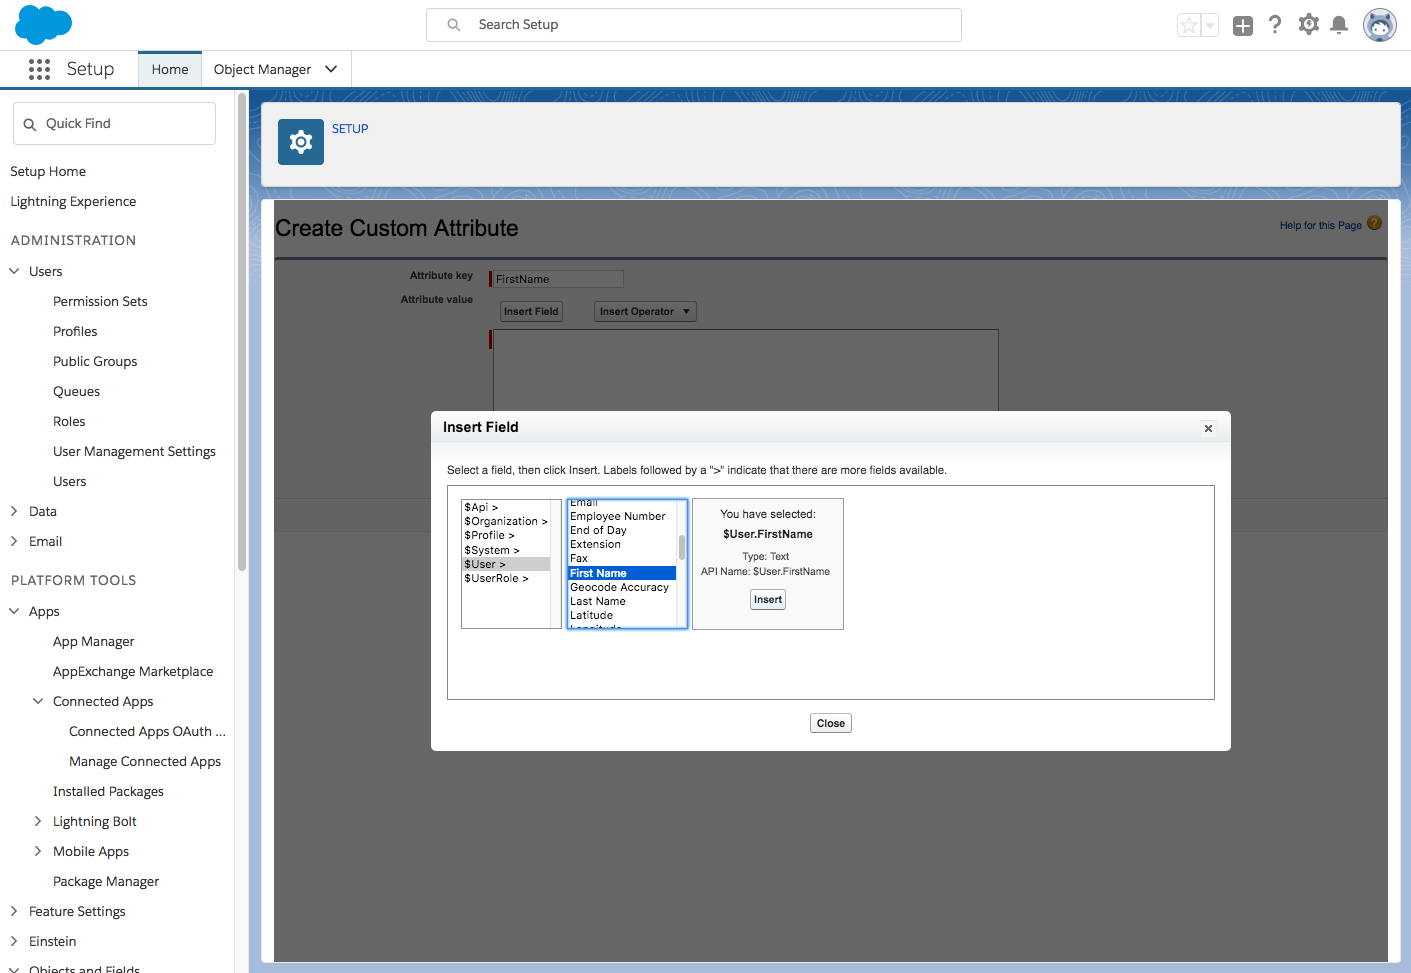
- Click Insert. Your selection now shows up in the Attribute value field.
- For most attributes, you would now be done. But if your attribute is complex, e.g., based on a picklist like the "Tehama Role" attribute, you can now edit the Attribute value field appropriately. See the list below for the text that should be in this field for each such complex attribute.
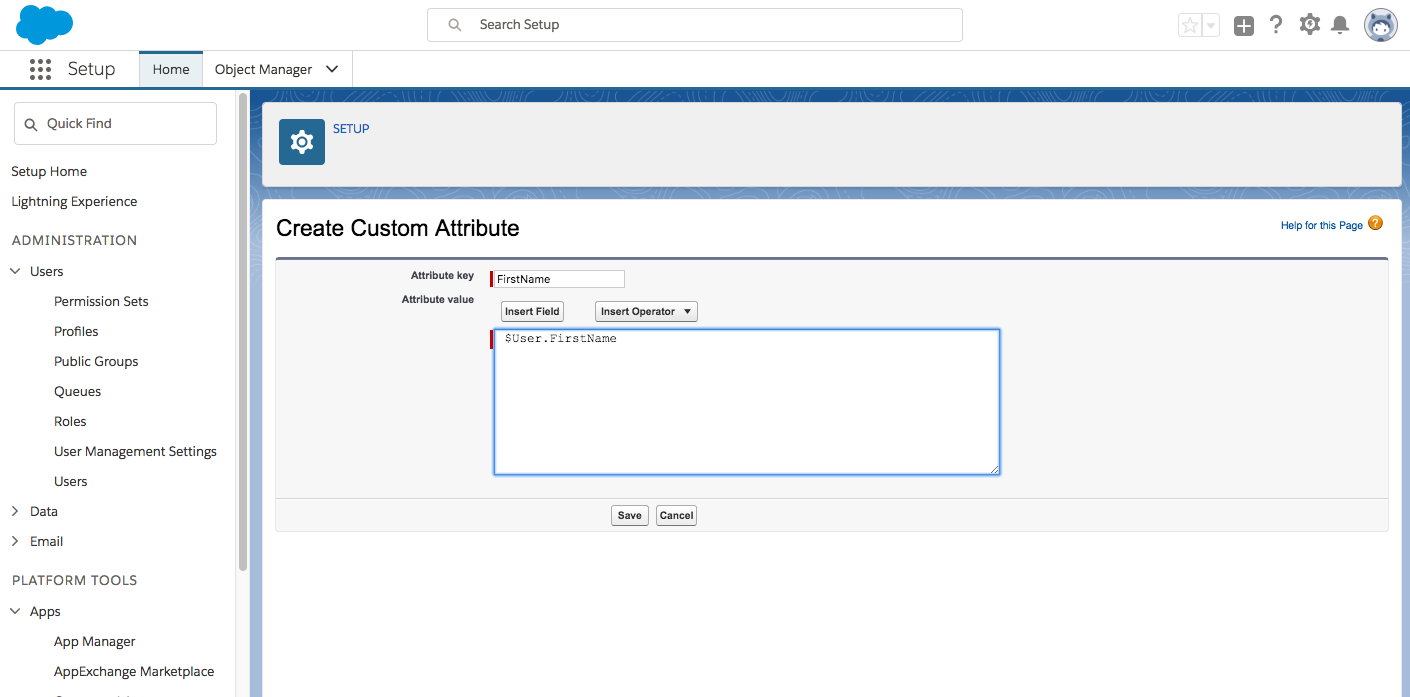
- Click Save

Repeat the above steps for the attributes you intend to auto-provision.
"Email", "First Name" and "Last Name" are mandatory. Optional attributes that not auto-provisioned will be given default values when the user is created and must be managed through the Tehama Web UI.
You will end up with a subset of the following custom attributes:
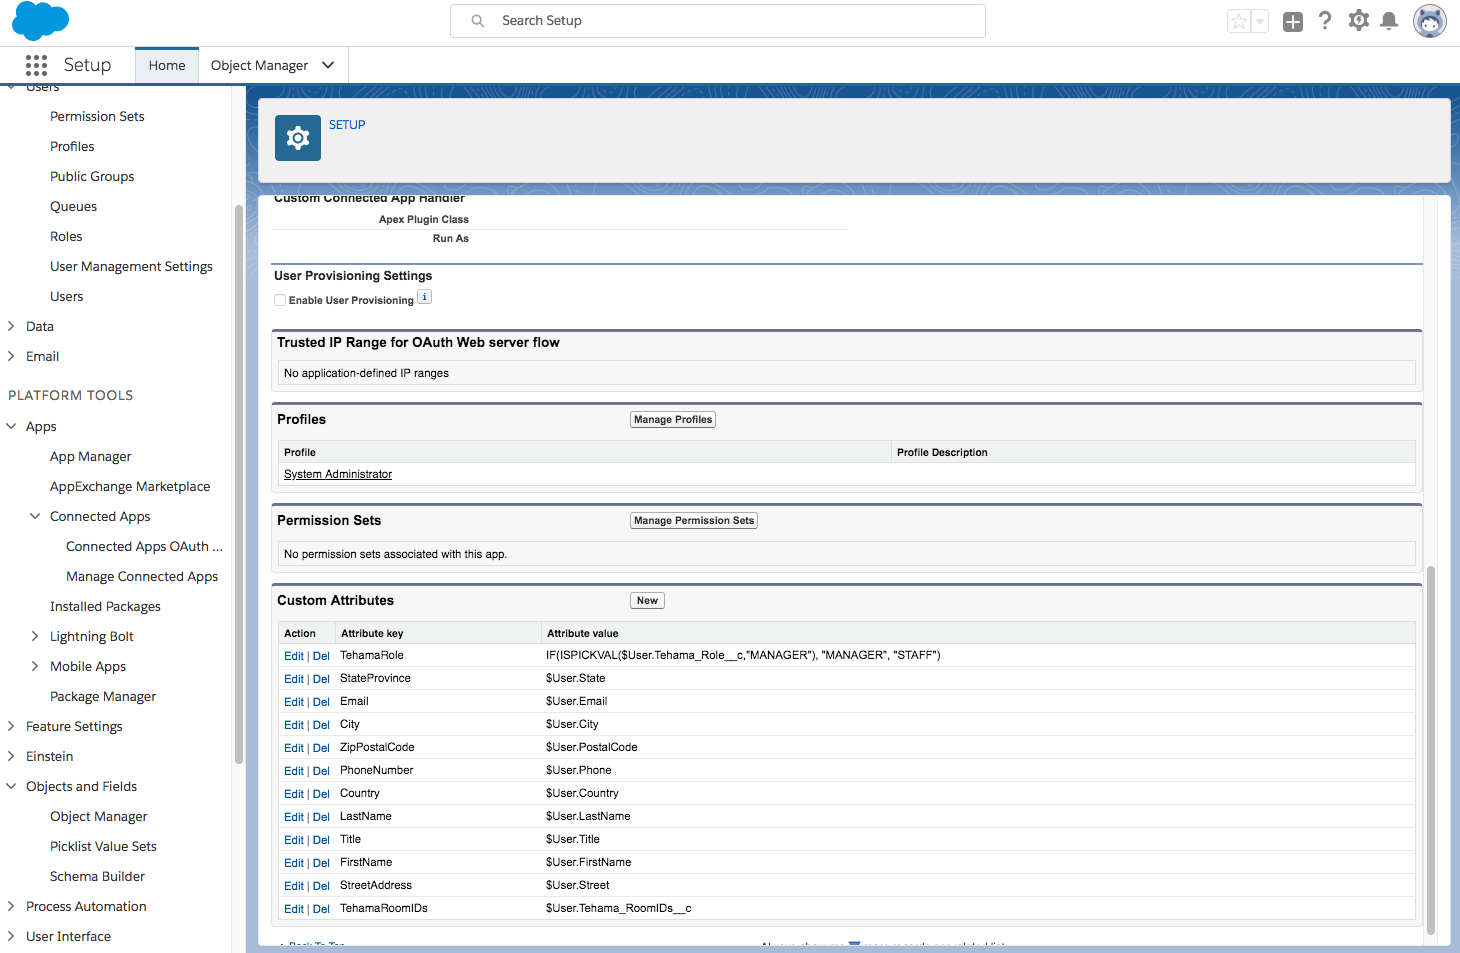
List of custom connected app attributes paired to the Salesforce user profile attributes:
- Email -> $User.Email mandatory
- FirstName -> $User.FirstName mandatory
- LastName -> $User.LastName mandatory
- Title -> $User.Title
- PhoneNumber -> $User.Phone
- StreetAddress -> $User.Street
- City -> $User.City
- StateProvince -> $User.State
- Country -> $User.Country
- ZipPostalCode -> $User.PostalCode
- TehamaRole -> IF(ISPICKVAL($User.Tehama_Role__c,"MANAGER"), "MANAGER", "STAFF")
- TehamaRoomIDs -> $User.Tehama_RoomIDs__c
User Provisioning Part Four: Map the Connected App's Custom Attributes to the Tehama User Profile in Tehama
Reason for completing this section:
This part is where you make the link between the attributes in your connected app for Tehama in Salesforce and Tehama's user profile.
Map the custom attributes you created in Part Three to the attributes in Tehama's user profile in the Tehama Web UI.
Steps for part four:
Login to Tehama using the Org Admin Account and click on the ORGANIZATION tab in the navigation bar.
Select the AUTHENTICATION tab. Scroll down to the USER PROVISIONING section (visible when the "Enable SAML Single-Sign on" checkbox is checked). Select "SAML" from the dropdown list of user provisioning options.
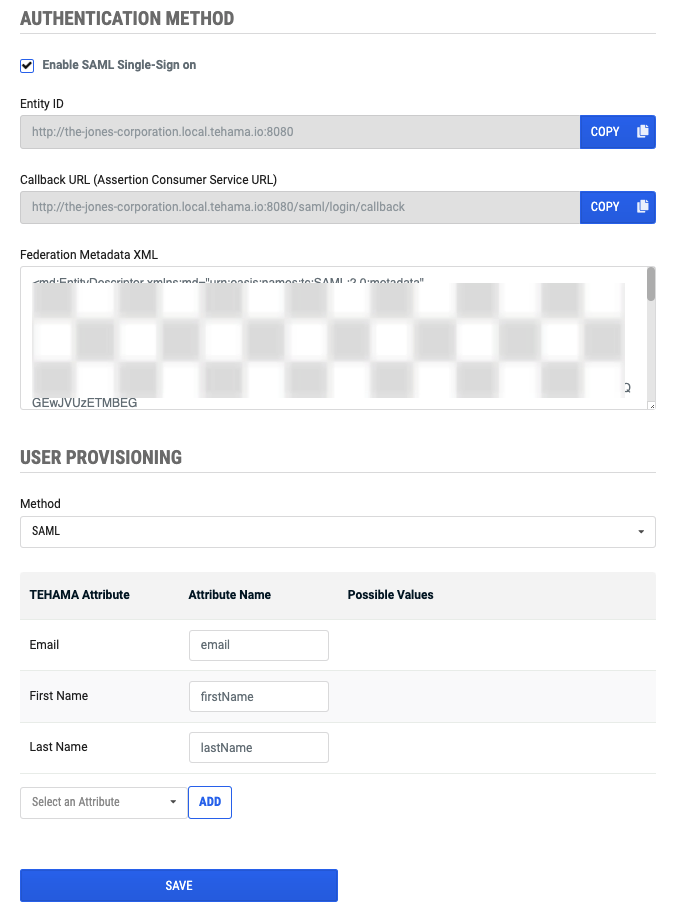
Add/remove attributes from the table as follows:
- Add: Select an optional attribute from the dropdown list and then click on the ADD button to add it to the table.
- Remove: Click on the 'X' in the row of an optional attribute to remove it from the table.
Enter the attribute names of the custom attributes you added to your Salesforce connected app for Tehama against the related Tehama account user attributes as follows:
- Email -> Email
- First Name -> FirstName
- Last Name -> LastName
- Role -> TehamaRole
- Default Room Ids -> TehamaRoomIDs
- Title -> Title
- Phone Number -> PhoneNumber
- Address -> StreetAddress
- City -> City
- State/Province -> StateProvince
- Country -> Country
- Zip/Postal Code -> ZipPostalCode
- Country of Citizenship -> Country
OPTIONAL If you have created custom roles for your organization without having acknowledged the SSO User Provisioning role setting limitation, and you have added the Role attribute (or if you have "SAML and SCIM" enabled), you will see the Acknowledgment: Authentication and Custom Roles & Permissions checkbox. You must place a checkmark in this checkbox, to acknowledge that all role setting must be done within Tehama from this point on. Aside from initial provisioning, the roles set within the identity provider will no longer be communicated to Tehama. Read the section Custom Roles & Permissions and SSO User Provisioning in the Corporate Single Sign On (SSO) Authentication and User Provisioning page for more information.
Click SAVE.
You have now set up user provisioning for your organization from your Salesforce connected app.
Notice the button FIND ROOM IDS in the Possible Values column for the entry for "Default Room Ids". Click FIND ROOM IDS to bring up a dialog from which you can select Tehama Rooms from your organization. This produces a copyable comma separated value (CSV) string that you can use to populate the value of the custom attribute you added to the Salesforce user profile for Tehama Room ids above in Part Two.